Landscape Lighting Calculator
Estimate outdoor fixture count, spacing, lumens, watts, beam coverage, voltage drop, and transformer load for paths, patios, steps, walls, trees, beds, and driveway edges.
Load a realistic outdoor zone, then adjust the length, fixture type, lumens, watts, spacing mode, beam angle, mounting height, wire run, and voltage limit.
Recommended spacing
--
Spacing target appears here.
Ambient coverage
--
Ambient target appears here.
Voltage drop
--
Wire drop appears here.
Transformer load
--
Load status appears here.
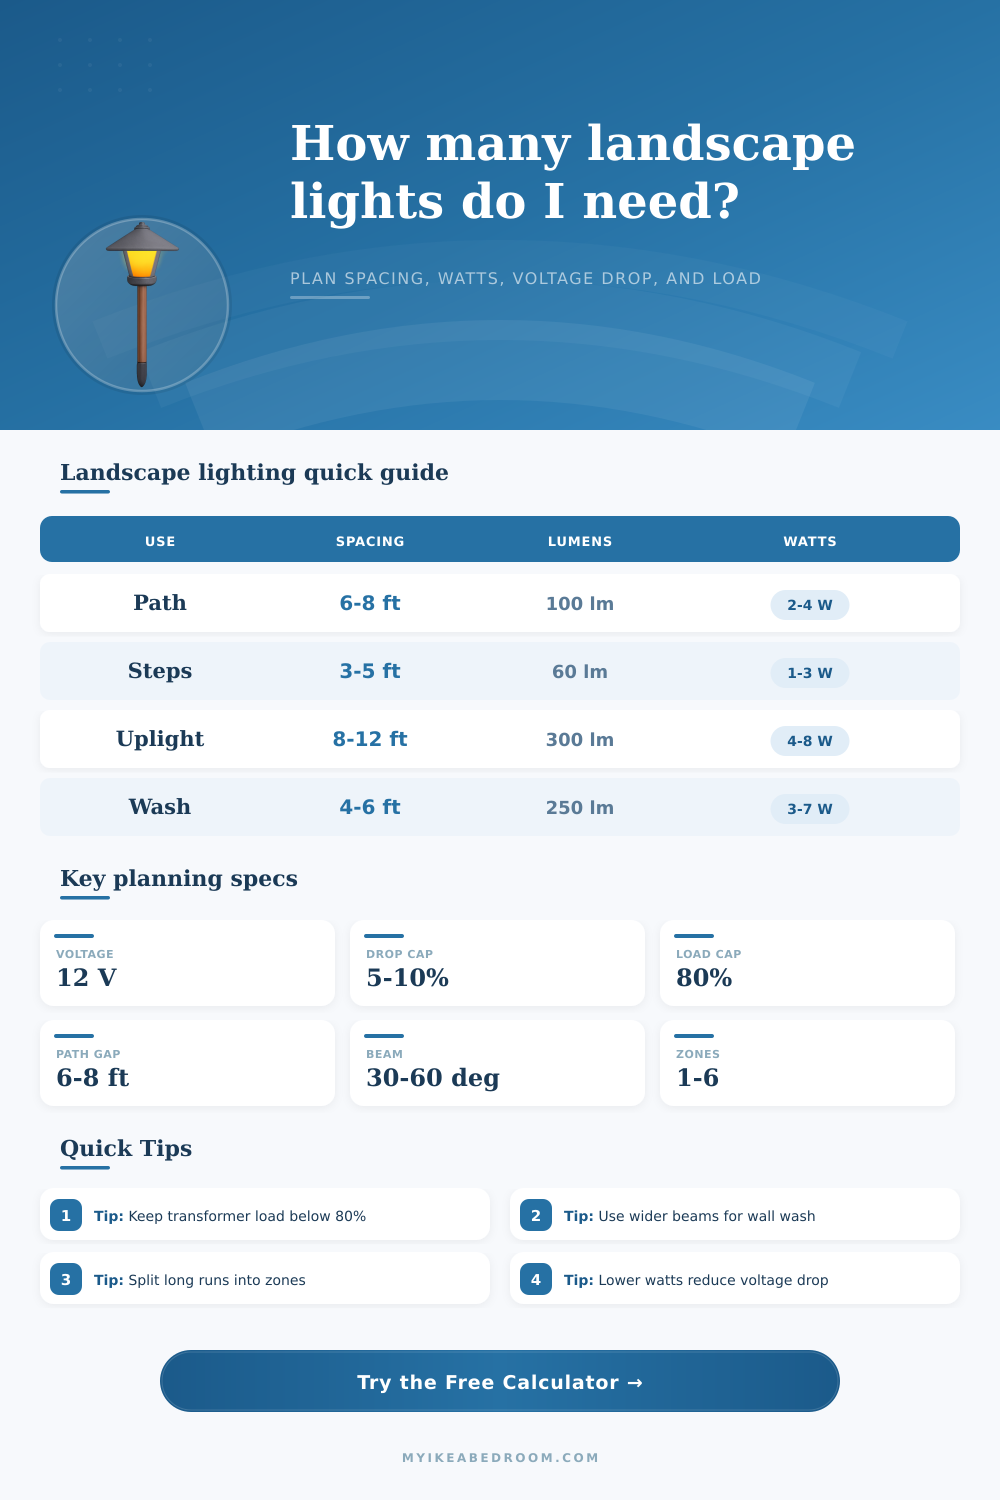
| Fixture use | Typical spacing | Common lumens | Common watts |
|---|---|---|---|
| Path light | 6 to 8 ft apart | 80 to 150 lm | 2 to 4 W |
| Step or deck light | 3 to 5 ft apart | 35 to 100 lm | 1 to 3 W |
| Tree or garden uplight | 8 to 12 ft apart | 180 to 500 lm | 4 to 8 W |
| Wall wash | 4 to 6 ft apart | 150 to 350 lm | 3 to 7 W |
| Bollard or marker | 8 to 12 ft apart | 120 to 300 lm | 3 to 6 W |
| Low-voltage string run | 2 to 4 ft lamp pitch | 40 to 80 lm | 0.8 to 2 W |
| Beam angle | Best use | Coverage style | Spacing note |
|---|---|---|---|
| 15 degrees | Tall narrow accent | Tight column | Use for trunks or narrow features |
| 30 degrees | Tree accent | Focused pool | Overlap lightly for texture |
| 45 degrees | Garden focal point | Medium pool | Good default for shrubs |
| 60 degrees | Wall wash | Wide blend | Place closer to the surface |
| 90 degrees | Low ambient fill | Broad wash | Use where glare is shielded |
| Wire gauge | Ohms per 1000 ft | Best for | Drop behavior |
|---|---|---|---|
| 18 AWG | 6.385 ohms | Short, small loads | Highest drop |
| 16 AWG | 4.016 ohms | Short path zones | Moderate drop |
| 14 AWG | 2.525 ohms | General landscape runs | Good default |
| 12 AWG | 1.588 ohms | Longer LED runs | Lower drop |
| 10 AWG | 0.999 ohms | Long high-load zones | Very low drop |
| 8 AWG | 0.628 ohms | Large trunk feeds | Lowest drop |
| Outdoor area | Target fc | Fixture density | Planning note |
|---|---|---|---|
| Subtle garden edge | 0.2 to 0.5 fc | Low | Accent more than illuminate |
| Residential path | 0.5 to 1.0 fc | Medium | Use alternating pools |
| Steps and transitions | 1.0 to 2.0 fc | Medium-high | Prioritize even footing |
| Patio perimeter | 0.8 to 1.5 fc | Medium | Blend with house lighting |
| Driveway edge | 0.3 to 0.8 fc | Low-medium | Mark edges without glare |
Voltage tip: When voltage drop exceeds the allowance, split the layout into more zones, use a heavier wire gauge, shorten the farthest run, or reduce watts per fixture.
Spacing tip: Path lights usually look better with overlapping pools and staggered sides; wall wash and step lighting usually need tighter, more regular spacing.
A system are used to provide light to the outdoor spaces. The lighting for these areas must be carefully plan to ensure the light reaches the desired areas. A person may find that the lighting system for there outdoor area does not work for their desired purposes if they are not familiar with how the light will travel across the area, as well as how the voltage will travel along the wire that will carry the electricity to each light fixture.
It is common for individuals to find that the last light fixture installed in an outdoor lighting system will be more dimmer than the first light fixture installed. This is due to the drop in voltage that occurs along the wire with increased length of the wire. A landscape lighting calculator can help a designer to calculate the drop in voltage along the wire.
Plan outdoor lights using a lighting calculator
The landscape lighting calculator will display the percentage of voltage that will be lost along the wire. The landscape lighting calculator ask the designer for several different inputs of the outdoor lighting system to calculate the voltage drop that will occur along the wire. The run length, the wattage of each light fixture, the gauge of the wire, and the distance from the transformer to the most distant light fixture will be the parameters entered into the landscape lighting calculator.
If the voltage drop that is calculated as a result of the landscape lighting calculator is too high, then the light fixtures will not have enough voltage to provide the desired brightness to each area. In addition to calculating the voltage drop, the designer will also have to consider the spacing of the light fixtures. Path lighting fixtures will not evenly illuminate the area that they are to illuminate.
Therefore, the path lights have to be placed into the path so that the pools of light from each fixture overlap. The distance between each path light fixture can be calculated based off both the mounting height of the fixtures and the beam angle of the light fixtures. These two factors will impact the distance between each light fixture that is needed to provide even lighting to the path.
The transformer is used to provide power to the light fixtures in the outdoor area. The designer must calculate the total wattage of each light fixture to ensure that it does not exceed the capacity of the transformer. In most cases, however, some extra capacity will be provided to the transformer for heat that is produced by the fixtures, as well as in case more light fixtures are added to the outdoor area in the future.
A common rule of thumb among landscape lighting designers is the 80% planning rule. This means that designers calculate how many watts each light fixture use, and ensure that the total does not come to 80% of the total capacity of the transformer. Additionally, the outdoor area may be divided into lighting zones.
Each zone will have its own wire run to each light fixture. Each zone will have to be calculated separately in the landscape lighting calculator. The length of the longest wire within a zone will determine the voltage drop for that zone.
Another factor to consider in the outdoor lighting system is the gauge of the wire. A heavier gauge for the wire will create less resistance in the wire, which will allow for less voltage drop in the outdoor lighting system. However, using a heavier gauge wire for the lighting system will cost more money for the outdoor area, as well as may be more difficult to install into the ground.
The landscape lighting calculator can be used to compare the voltage drop of the area with different gauges of wire. Most residential outdoor lighting systems will use 14 gauge or 12 gauge wire. The mounting height and beam angle of each light fixture will impact the area that each light covers.
Light fixtures with a narrow beam will illuminate a smaller area than light fixtures with a wide beam. Therefore, narrow beam lighting fixtures may have to be purchased in greater numbers to illuminate a large outdoor area. Light fixtures with a wide beam will illuminate a larger area, and fewer lights may be necessary to illuminate a large outdoor area.
The landscape lighting calculator will allow designers to estimate the size of each pool of light created by each light fixture. This will allow the designer to ensure that the mounting height and beam angles of each fixture are set up appropriately according to the size of the areas that must be illuminated. Finally, another important factor in the planning of the lighting system is the ambient light target for each area.
Some outdoor areas require a significant amount of light, while other areas may only require a little light to illuminate the area for decoration. The landscape lighting calculator will allow designers to set an ambient light target for each area that is to be illuminated. When such a target is entered into the landscape lighting calculator, the landscape lighting calculator will calculate the total number of light fixtures that is required to provide the amount of light that is targeted for each area.
If the light fixtures that are to be used in the outdoor area have a low lumens value for the amount of light that each fixture will create, then an increased number of light fixtures will be required to reach the target for ambient light in each area. The outdoor area that is to be illuminated may have some unevenness to the terrain of the area. In addition, there may be trees or other structures within the area that may block the light from the fixtures to the areas that are to be illuminated.
Therefore, the landscape lighting calculator plan the lighting fixtures for these areas. The lighting designer can walk the area after the lighting system is installed at night to ensure that the pools of light are in the correct locations in the area. Using a flashlight can help direct the designer to any areas that may be blocked by trees or other terrain features.
Finally, it is important to plan for extra capacity within the transformer to allow for the addition of more light fixtures to the landscape lighting system in the future. You’ll find that it should of been planed better.