Raised Panel Door Calculator
Calculate finished door parts from stile and rail width, groove depth, expansion gap, reveal, material thickness, raised profile width, door count, and arch style.
Start with a cabinet, wardrobe, vanity, drawer, arched, or furniture door setup, then tune the joinery dimensions for your cutters and stock.
Inset opening check
0 x 0 in
Opening size implied by the reveal on all sides.
Visible flat field
0 x 0 in
Panel face remaining after the raised profile is cut.
Panel capture
0 in
Total panel edge held inside the frame grooves.
Batch pieces
0 pieces
Stiles, rails, and raised panels across the door count.
| Part | Formula | What it includes | Shop note |
|---|---|---|---|
| Stile length | Finished door height | Full outside height | Cut pairs together for matching length |
| Rail length | Door width - 2 stiles + 2 grooves | Stub tenons or cope-and-stick tongue | Confirm with your cutter set test piece |
| Panel blank width | Door width - 2 stiles + 2 grooves - 2 gaps | Panel buried in side grooves with expansion room | Do not glue raised panels into grooves |
| Panel blank height | Door height - top rail - bottom rail + 2 grooves - 2 gaps | Panel buried in rail grooves with expansion room | Arch choices subtract extra top rail stock |
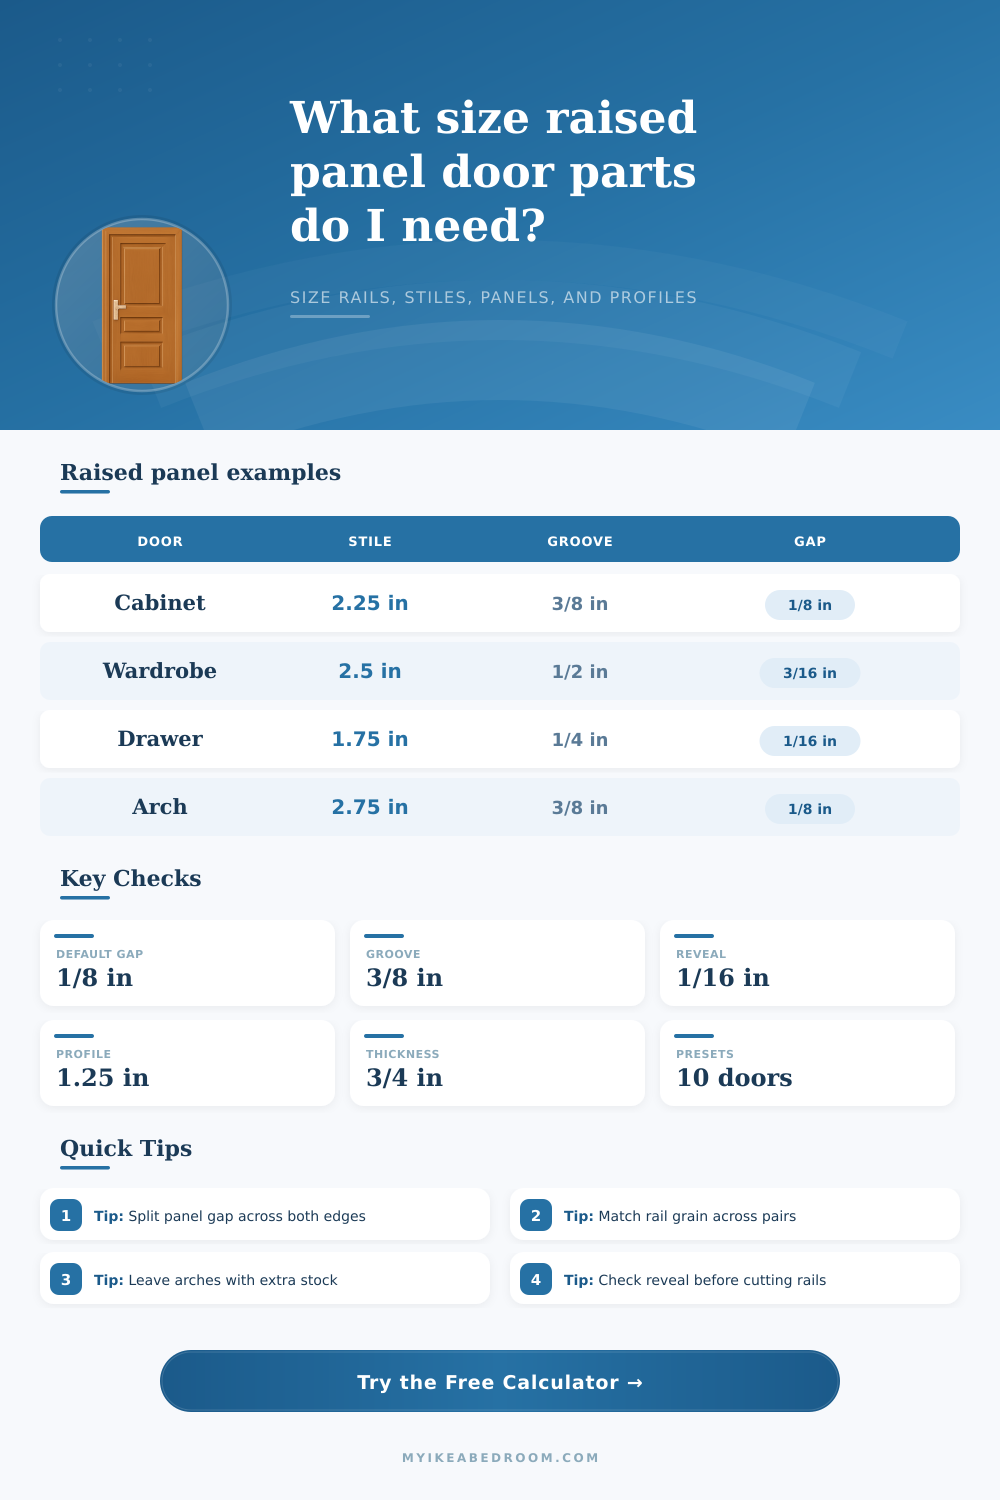
| Door type | Stile width | Rail width | Construction use |
|---|---|---|---|
| Small cabinet door | 1.875 to 2.25 in | 1.875 to 2.5 in | Wall cabinets and narrow bases |
| Standard base door | 2.25 to 2.5 in | 2.25 to 2.75 in | Typical kitchen or vanity cabinet fronts |
| Tall wardrobe door | 2.5 to 3 in | 2.75 to 4 in | Long doors that need more visual weight |
| Raised drawer front | 1.5 to 2 in | 1.5 to 2.25 in | Short parts with a smaller center panel |
| Furniture panel door | 2.25 to 3.25 in | 2.5 to 3.5 in | Sideboards, hutches, and built-ins |
| Setup | Groove depth | Gap per side | Best fit |
|---|---|---|---|
| Light cabinet cutters | 1/4 in | 1/16 in | Small doors, plywood panels, painted work |
| Standard cope-and-stick | 3/8 in | 1/16 to 1/8 in | Most solid raised panels and cabinet doors |
| Deep groove frame | 1/2 in | 1/8 to 3/16 in | Wide panels or rooms with seasonal humidity change |
| Stable panel material | 1/4 to 3/8 in | 1/32 to 1/16 in | MDF or plywood center panels with little movement |
| Top option | Extra top stock | Panel field effect | Layout note |
|---|---|---|---|
| Square top rail | 0 in | Full straight field | Best for paired cabinet doors |
| Soft arch | 1.5 in | Small height reduction | Leave room to fair the curve |
| Eyebrow arch | 2 in | Moderate crown sweep | Good for vanity and hutch doors |
| Cathedral arch | 3 in | Large center rise | Match templates across a door pair |
| Extra-wide square top | 1 in | Smaller panel opening | Useful above tall wardrobe panels |
Cut rail tests first: Rail length depends on the tongue or groove actually made by your bit set. Run a short test rail and measure the buried tongue before cutting the door batch.
Float the panel: The expansion gap is counted at every panel edge. Center the panel, use space balls or small pads if needed, and keep glue off the panel edges.
A raised panel door has several different parts. The parts of a raised panel door are the stiles, the rails, and the panel. The stiles are the vertical parts of the door.
The rails are the horizontal parts of the door. The panel is the part of the raised panel door located between the stiles and the rails. Because these three parts relate to one another, changing the measurement of just one will have an impact upon the other measurement of the door.
Parts and Measurements of a Raised Panel Door
The width of the stiles and the rails are one of the primary design decisions that must be made when creating a raised panel door. If an individual chooses to use narrow stiles and rails, the resulting raised panel door will appear as if it is lighter in weight. Additionally, narrow stiles and rails are generally appropriate for small wall cabinets.
Alternatively, if the individual choose to use wide stiles and rails, the resulting raised panel door will appear more substantial. Such wide stiles and rails is appropriate for tall wardrobe doors or furnitures. The width of the stiles and the rails will also have an impact upon the amount of the center panel that is visible.
If the stiles and the rails are made very wide, there will be less of the central panel visible in the raised panel door. The panel must be able to move within the stiles and the rails in order to allow the wood to expand and contract in response to changes in the environment. The individual will have to cut a groove into the stiles and the rails in order to allow the panel to be secured to these parts of the raised panel door.
The depth of the groove must be calculated in relation to the size of the expansion gap that will be provided for the panel. If the expansion gap is too small, the panel may crack the frame of the raised panel door in humid conditions. If the expansion gap is too large, the panel may rattle within the stiles and the rails of the raised panel door in dry conditions.
More room must be provided within the stiles and the rails for the panel if the raised panel door is made of solid wood rather than plywood or MDF. The shape of the top rail will also have an impact upon the dimensions of the raised panel door. If the top rail is to be square in shape, fewer pieces of wood will be required for its construction.
However, if the top rail is to be arched in shape, more wood will be required for such a top rail. As a result, the height of the panel will be less because the arched top rail will use some of the height of the raised panel door. The calculator that is provided will help the individual to understand how the use of an arched top rail will impact the dimensions of the raised panel door.
The thickness of the wood that is used to create the raised panel door will also impact the raised panel door. Three-quarter-inch (3/4”) stock is the type of wood that is typically used for cabinet doors. Using three-quarter-inch stock for the stiles, the rails, and the panel provides enough surface area for the glue to adhere to each joint.
For furniture doors, thicker stock can be used to provide the feeling of substantiality to the furniture doors. However, using thicker wood will increase the amount of board footage of the wood that is required for the creation of the raised panel door. Calculating the amount of material that will be necessary for the creation of the raised panel door is a necessary task for the individual that is creating the raised panel doors.
The individual will have to calculate the linear feet of the stile and rail stock that is required. The individual must also calculate the area of the panels that will be used. Calculating the amount of board footage for the frame and the panel will allow the individual to understand the total amount of wood that will be required to build the raised panel doors.
This calculation of the total amount of wood that will be required for the raised panel doors is an important calculation for individuals with limited budgets for purchasing wood. Errors are often made when individuals dont consider how the different measurements of the raised panel door are related to each other. For instance, when an individual selects the width of the stiles and rails, there is a chance that the individual will not account for the length of the joinery of the stiles and rails.
Another type of error that can be made is selecting the size of the panel for a door that is to be square in shape, but then discovering that the arched top rail will require more height than is available for the panel. To avoid these types of errors, the individual should of use the provided calculator for the raised panel door to ensure that all measurements are accounted for and have an impact upon the other measurement of the raised panel door. The panel that is to be constructed within the stiles and rails must be able to move within the stiles and rails.
Consequently, the individual should not place glue on the edges of the raised panel door. The use of glue will lock the panel in place and cause the wood of that panel door to crack due to it’s movement within the stiles and the rails. Instead, spacer pads or space balls can be used to even the panel within the stiles and rails.
Furthermore, the finish should be applied to the panel prior to assembly. Applying a finish to the panel will allow the individual to avoid the possibility of the raw wood of the panel being visible. The reveal of a raised panel door is the distance between the edge of the door and the face frame or the opening in which the raised panel door will be installed.
While the reveal is not part of the size of the door, it does impact the appearance of the raised panel door. If the reveal is maintained throughout the raised panel doors, the raised panel doors will appear as if they are intentionally designed. However, if the reveal is not maintained, the raised panel doors will not appear as if they are correctly made.
Finally, the grain of the wood can be matched for the various raised panel doors. If the grain of the panel and the rails of the raised panel door is matched between two doors, the doors will appear as if they are meant to be used together.