Bevel Angle Calculator
Convert an included joint angle into a saw bevel setting with board thickness, cut orientation, table angle, bevel direction, miter pairing, kerf, test allowance, reference face, and tolerance checks.
Pick a close shop scenario, then adjust the included angle, board thickness, kerf, saw reference, and pairing before making a test cut.
Bevel setup breakdown
| Finished included angle | Equal bevel per piece | Complement | Typical use |
|---|---|---|---|
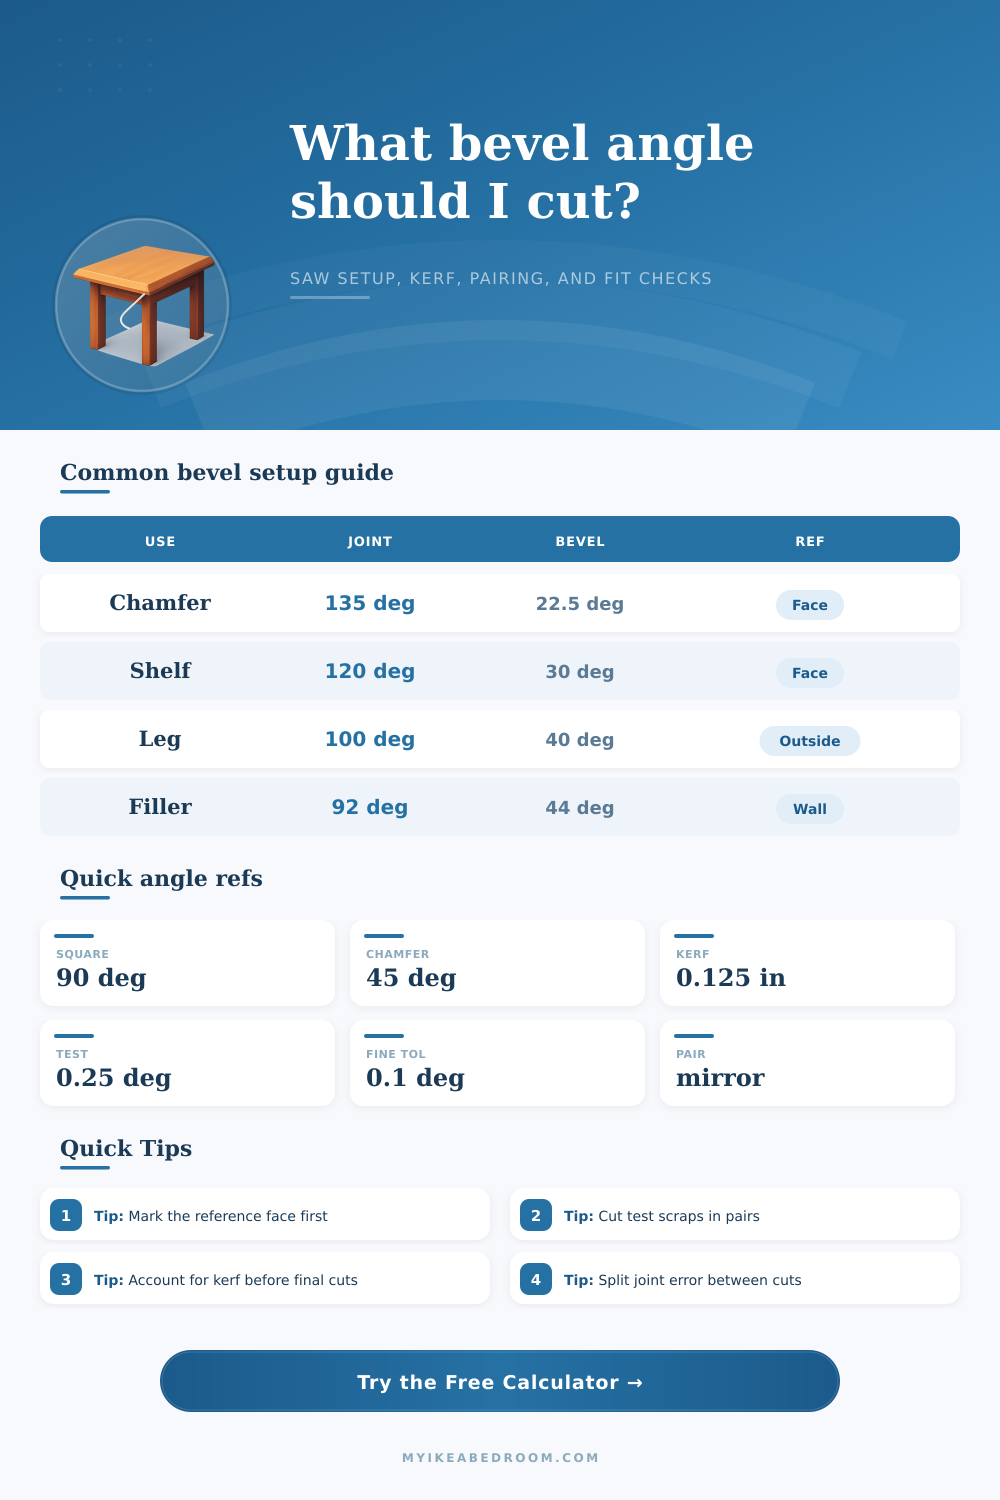
| 60° | 60° | 30° | Sharp triangular or splayed joint |
| 90° | 45° | 45° | Cabinet box, square return, frame edge |
| 100° | 40° | 50° | Splayed furniture leg or angled rail |
| 120° | 30° | 60° | Sloped shelf edge, hex-style corner |
| 135° | 22.5° | 67.5° | 45 degree chamfer or softened corner |
| 150° | 15° | 75° | Light bevel, eased furniture detail |
| Reference face | Best for | Bevel direction note | Setup check |
|---|---|---|---|
| Outside show face up | Visible frames, shelves, filler strips | Mirror left and right pieces | Keep pencil marks on the show face |
| Inside face up | Boxes, lids, internal returns | Flip stock for the matching side | Dry-fit with inside faces touching |
| Factory edge against fence | Rip bevels and long cabinet parts | Direction follows blade tilt | Jointed edge stays against the fence |
| Wall or scribe face | Cabinet filler and uneven walls | Cut proud, then plane to the line | Hold the scribed edge to the wall |
| Top face on saw table | Chamfers and tabletop undercuts | Top or bottom changes the reveal | Check the offcut before the final pass |
| Blade or allowance | Common value | Use in calculator | Practical note |
|---|---|---|---|
| Thin kerf blade | 0.094 in | Kerf input | Good for small stock and lower-power saws |
| Full kerf blade | 0.125 in | Kerf input | Common cabinet and trim setup |
| Heavy dado or rough pass | 0.187 in | Kerf input | Use only if the bevel cut removes extra width |
| Fine test allowance | 0.10 deg | Test cut allowance | For tuned saws and short furniture parts |
| General test allowance | 0.25 deg | Test cut allowance | Good first bracket for most bevel joints |
| Tolerance per cut | Joint expectation | Score range | Recommended action |
|---|---|---|---|
| 0.05 to 0.10 deg | Fine furniture or visible miters | 90 to 100 | Cut paired scraps and sneak up slowly |
| 0.10 to 0.25 deg | Cabinet fillers, frames, shelves | 80 to 94 | Dry-fit before glue or fastening |
| 0.25 to 0.50 deg | Painted trim or hidden bevels | 65 to 82 | Expect light sanding or caulked edges |
| 0.50 deg plus | Rough layout or first scribe pass | Below 70 | Use this only for a rough test cut |
Mirrored pair
Best for: two beveled boards meeting cleanly at the desired included angle.
Cut one left and one right, then bring the two freshly cut faces together for the most predictable dry fit.
Single bevel
Best for: cabinet fillers, scribe strips, and bevels against a square cabinet side.
The one cut carries the full angle change, so the saw setting is steeper than an equal pair.
Same direction
Best for: parallel chamfers, repeated rail edges, and decorative bevels.
Use stop blocks or a fence reference so every piece keeps the same show-face orientation.
Four-piece frame
Best for: boxes, lids, frames, and beveled mirror or picture rail assemblies.
Small errors multiply around the frame, so the fit score weighs tolerance more heavily.
A bevel cut are an angled cut made through the thickness of a piece of wood. A bevel cut require several different measurement of the wood to ensure that the pieces of the wood will fit corectly with other pieces of the same type of wood. If a bevel cut is not made accurate, the wood may either not fully close or may lead to a gap in the wood structure.
Furthermore, a bevel cut isnt just a single angle; the angle of the cut is dependant upon the thickness of the wood, the direction of the saw, the reference face of the wood, and the type of joint that is being form. The calculator included in this article will assist in calculating the setting for the saw necessary to achieve the desired bevel cut. You must enter the angle that is included between the two piece of wood that will be joined together into the calculator, as well as the thickness of the wood.
How to set the saw for a bevel cut
Additionally, the angle at which the saw must be oriented, whether the joint is made up of mirrored pair of wood pieces, a single bevel cut, or a four-piece joint will also impact the settings for the saw. The calculator will output the tilt angle of the saw’s blade, the angle that is complementary to the angle entered for the joint, the run of the bevel cut across the thickness of the wood, and a “fit score” for the joint that will allow the wood to be cut accurate. People often struggle with bevel cuts because it is easy to lose track of which face of the wood is referenced for the bevel cut.
Should the reference face for the bevel cut be flipped, the tilt angle of the saw will reverse in the finished piece of wood. However, the saw calculator will ask for the reference face of the wood at the beginning of the bevel cut, and will also show which way the bevel should lean. Another factor in the formation of a bevel cut is the kerf of the saw blade.
The kerf is the thickness of the wood that the saw blade removes. Thin-kerf saw blade will remove less wood than saw blades with a thicker kerf. Furthermore, the thin kerf will impact the drift of the centerline of the cut when the saw blade is tilted.
To account for the kerf of the saw blade, the saw blade calculations include a half-kerf in the calculation of the offset of the saw. Tolerance is another important factor in bevel cut calculations. Errors in bevel cuts will multiply across the number of pieces of wood that are sawn.
For instance, a 0.25 degree error may be considered significantly for a single piece of wood to be cut, but will become a significant problem for a four-piece frame that is expected to equally join. The fit score that the saw blade offset calculator provides will allow woodworkers to determine if their tolerance for error in the saw blade, the kerf of the saw blade, and the type of joint that is being form will create errors in the finished project. A low fit score suggest that test cuts should of been made in wood scraps before wood for the project is cut.
In many woodworking projects, a bevel cut will also be made in conjunction with a miter cut. For instance, the leg on a table may require both cuts to ensure that the leg will sit even with the rest of the table. The saw blade offset calculator can model these conditions by making adjustments to the orientation and reference face of the saw blade.
These adjustment will impact the settings of the saw and the offset of the saw blade. Common mistake include entering the included angle for the joint instead of the bevel angle; the bevel angle is the angle of the saw blade relative to the face of the wood. Another common mistake is to forget that the angle of a single bevel is steeper then equal bevels that join together.
Finally, another common mistake is to forget that the kerf of the saw blade change when the saw blade is tilted to form a bevel. A successful bevel cut will allow for the joint to be completed in a repeatable fashion. Furthermore, the cut will produce the two cutting face of the wood, and will allow for sufficient material to make any necessary adjustment to the saw blade cut.
Thus, although the saw blade offset calculator will provide the number for the bevel cut, the saw blade will have to be mark to allow for the bevel cut to be made.