Lighting Circuit Calculator
Estimate lighting fixture watts, branch-circuit amps, continuous-load derating, dimmer or driver limits, zone demand, spare capacity, maximum fixture count, and wire-run voltage drop for planning a lighting circuit.
Load a common lighting run, then adjust fixture wattage, count, voltage, circuit rating, derating, dimmer capacity, driver power factor, zones, spare capacity, and wire length.
| Lighting use | Typical input watts | Voltage context | Planning note |
|---|---|---|---|
| Bedroom recessed LED cans | 8 to 14 W each | 120 V branch | Usually low current, but count every fixture on the switch leg. |
| Kitchen under-cabinet LED bars | 3 to 8 W per ft | 12 V or 24 V driver | Check both the branch circuit and the driver output rating. |
| Garage linear shop lights | 35 to 80 W each | 120 V branch | Long-on use often deserves the continuous-load derate. |
| Outdoor path lights | 2 to 8 W each | 12 V or 24 V | Voltage drop can dominate before wattage reaches the supply limit. |
| Wire size | Ohms per 1000 ft | Good planning use | Voltage-drop note |
|---|---|---|---|
| 22 AWG copper | 16.14 ohm | Short low-current fixture leads | Too small for most branch or long low-voltage runs. |
| 18 AWG copper | 6.385 ohm | Short LED strip feeds | Useful for small loads; watch higher current paths. |
| 14 AWG copper | 2.525 ohm | Common 15 A branch wiring | Typical resistance value for branch-drop estimates. |
| 12 AWG copper | 1.588 ohm | Common 20 A branch wiring | Lower resistance helps longer lighting home runs. |
| 10 AWG copper | 0.999 ohm | Long feeders or large low-voltage trunks | Often selected to reduce drop, not because load needs amps. |
| Control type | Rating to check | Derate to consider | Common mismatch |
|---|---|---|---|
| Wall LED dimmer | LED watt rating or VA rating | Multi-gang boxes can reduce rating | Using incandescent watts for LED drivers. |
| 0-10 V dimming driver | Driver input VA and output watts | Thermal and enclosure limits | Counting fixture output watts only. |
| Low-voltage transformer | Output watts or VA | Continuous landscape lighting use | Ignoring voltage drop at the far lights. |
| Relay or smart switch | Lighting load type and amps | Motor, fan, or mixed-load restrictions | Assuming every relay supports LED inrush. |
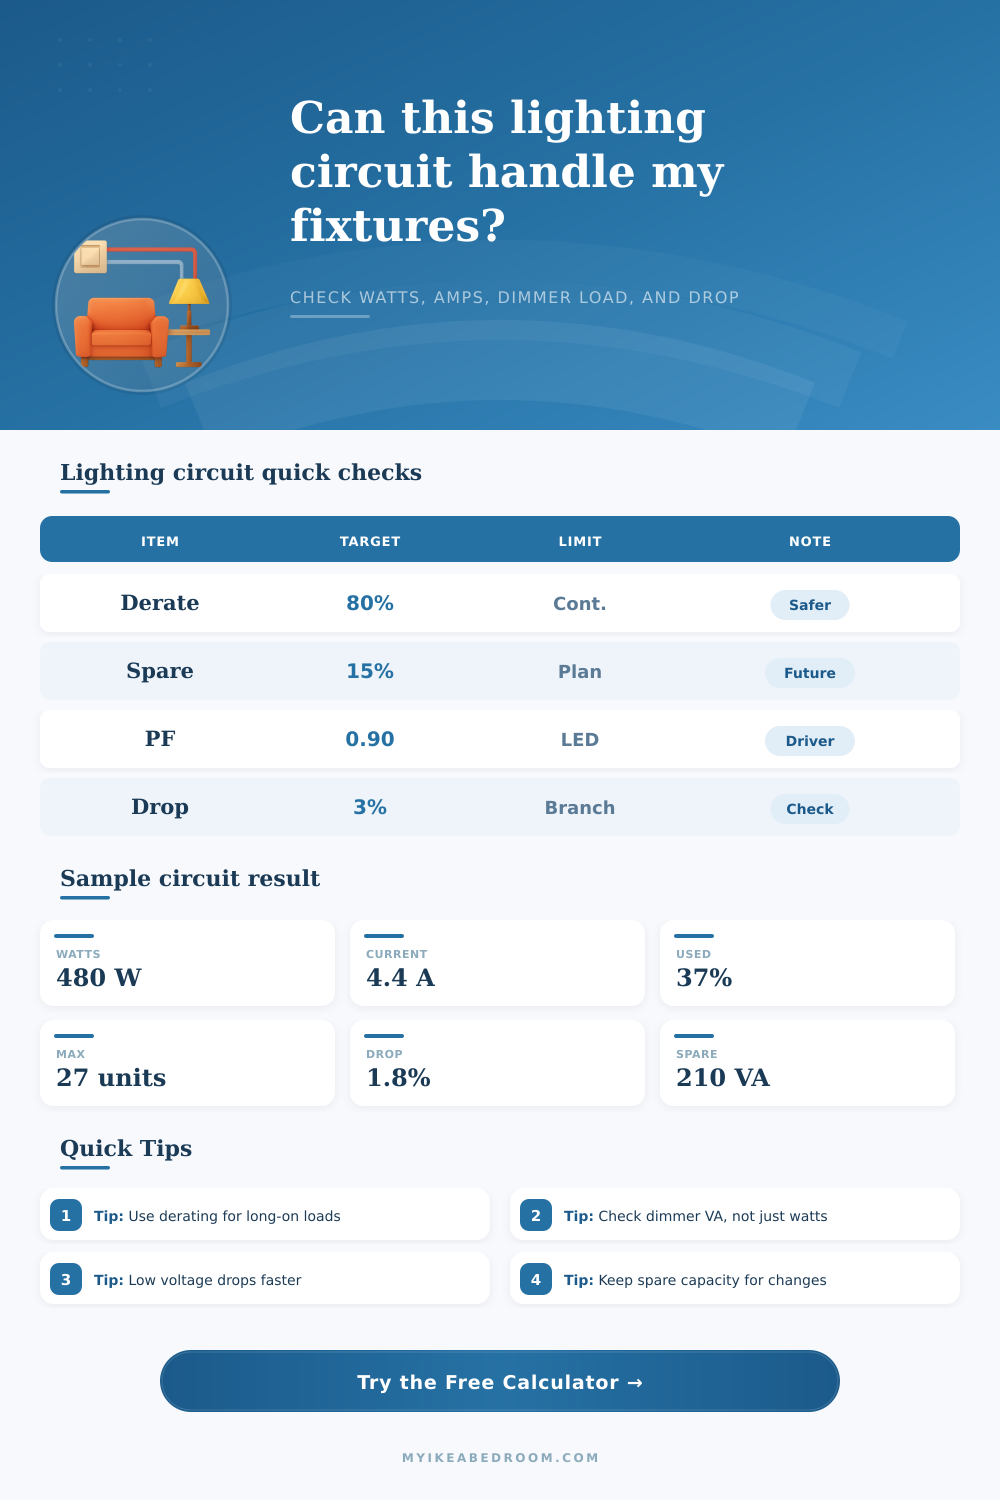
| Circuit rating | Voltage | 80% continuous capacity | With 15% spare target |
|---|---|---|---|
| 15 A lighting circuit | 120 V | 1440 VA | 1224 VA planning load |
| 20 A lighting circuit | 120 V | 1920 VA | 1632 VA planning load |
| 10 A low-voltage supply | 24 V | 192 VA | 163 VA planning load |
| 5 A low-voltage supply | 12 V | 48 VA | 41 VA planning load |
Best fit: bedrooms, halls, closets, and light general loads.
Watch: shared loads and long-on lighting scenes.
Check: 14 AWG branch resistance in the voltage-drop estimate.
Best fit: garages, basements, workshops, and dense fixture counts.
Watch: dimmer rating can limit the run before the breaker does.
Check: 12 AWG drop on long home runs.
Best fit: strips, path lights, cabinets, wardrobes, and shelf runs.
Watch: current rises quickly at 12 V and 24 V.
Check: voltage drop at the far fixture.
Best fit: rooms where accent, task, and general lights are separate.
Watch: all zones may still need to be allowed in a load check.
Check: simultaneous load and spare capacity together.
Fixture count: LED replacement lamps and integrated fixtures can have very different input watts. Use the electrical input rating from the fixture or driver label, not the incandescent-equivalent number.
Voltage drop: A branch circuit may have plenty of amp capacity while a long low-voltage run still dims at the end. Extra feed points or larger wire often matter more than a larger supply.
When planning an lighting circuit, you must manage the electrical load so that the electrical systems remains stable. While many people believe that adding more LED lights are easy due to the low power consumption of LED lights, adding more LED lights can have an impact on the electrical hardware. Electrical planning isnt about adding more lights but about managing the electrical hardware’s response to the electricity.
You must understand the concept of the power factor. The power factor determine how efficient the light fixture uses the electricity. While the wattage of the light bulb will tell you the wattage of the light bulb, it is the driver of the light that determines the electrical load on the house wiring.
How to Plan a Safe LED Lighting Circuit
The driver panels of budget LED lights has a low power factor. This means that they draw more current from the electrical line than the wattage of the bulb would suggest. Should you ignore the power factor, the excessive current draw from the LED lights may cause the breaker to trip.
You must also consider the continuous load. The continuous load will impact the amount of heat in the lights and the electrical breaker. The continuous load will be any lights that is on for long periods of time, like lights in the garage or commercial facility.
If you run lights for many hours, heat will build up in the wires and the breaker. Excessive heat can cause electrical breaker to trip. To avoid this, professional will usually include a derating factor in the electrical load calculation.
This factor will cap the load at eighty percent of the rating of the breaker. By capping the electrical load at eighty percent of the breaker’s rating, there will be a safety buffer to ensure that the breaker dont trip due to the electrical load. The dimmer switch of the LED lights is another component to consider.
The dimmer switch may limit the number of LED lights that can be installed in the circuit. The dimmer switch may have a low wattage rating for the LED lights. If the total wattage of the LED lights is above the rating of the dimmer switch, it can cause the dimmer switch to overheat or cause the LED lights to flicker.
Thus, you must check the rating of the dimmer switch to ensure that it do not become a weakness in the electrical circuit. Another factor to consider is the voltage drop. This is an issue for installations of low voltage lights, such as twelve volt or twenty-four volt LED lights.
The voltage drop occur due to the loss of pressure of the electricity as it travels through the copper wire of the LED lights. If the wire of the LED lights is too thin or too long, there will be a voltage drop at the lights at the end of the wire installation. This will make the LED lights at the end of the wire string appear more dimmer than the rest of the LED lights.
You can use a larger gauge wire to prevent this voltage drop, but using a larger gauge wire will increase the cost of the installation. You must leave spare capacity in the lighting circuit for the future. If you install all of the LED lights that a circuit is designed to handle, then the lighting circuit will not be able to handle any additional LED lights in the future.
By leaving spare capacity in the lighting circuit, it will allow for any future upgrade in the lighting design. A fifteen percent buffer in the lighting circuit is suggested. This buffer will provide time and space for the lighting circuit to accommodate any future changes.
Additionally, zoning can be used in lighting installations. Using zoning, only certain lights can be on at one time. However, the lighting installation must plan for the worst-case scenario in which all of the LED lights are on at once.
When planning a lighting circuit, you must manage the relationship between the power source, the controller, and the distance in which the electricity will travel. You must account for the power factor, the continuous load, and the voltage drop. When you account for the power factor and the voltage drop, you will ensure that there is enough pressure in the electricity reaching the lights and that the electrical hardware dont overheat.