Panel, trim, and finish takeoff
Beadboard Calculator
Estimate beadboard sheets or planks for wainscot, full-height walls, ceilings, and custom areas. Compare common presets, trim packages, fastener spacing, and paint-ready coverage in one layout.
| Profile | Type | Net coverage | Typical use |
|---|---|---|---|
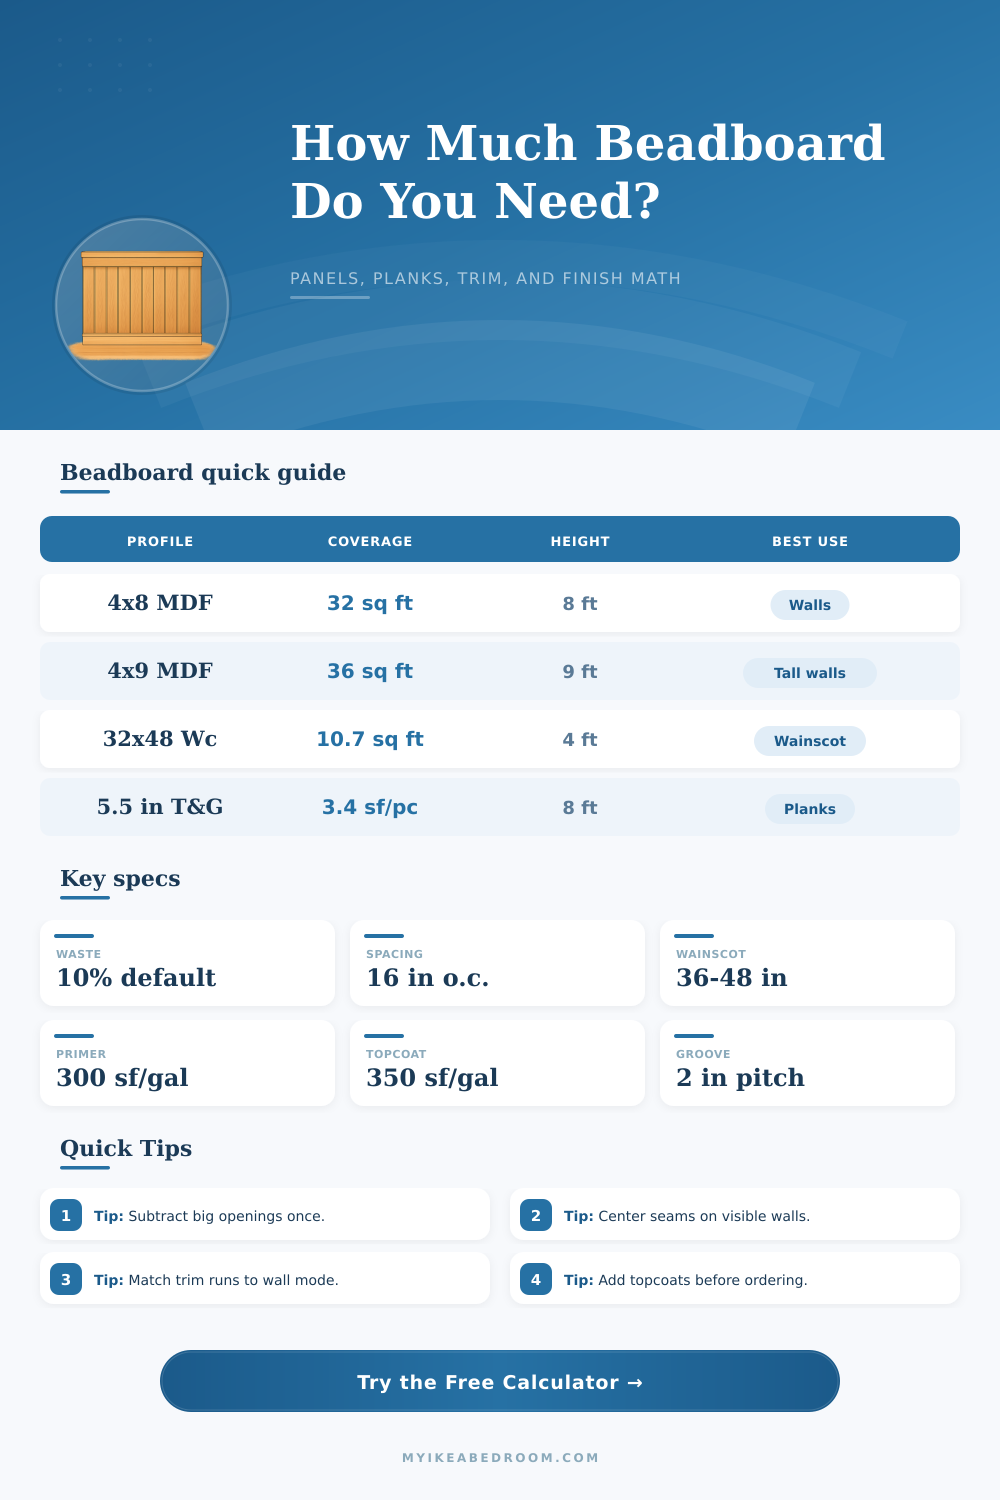
| 4 x 8 MDF sheet | Sheet panel | 32 sq ft | Bedrooms, halls, media walls |
| 4 x 9 MDF sheet | Sheet panel | 36 sq ft | Tall accent walls |
| 32 x 48 panel | Wainscot panel | 10.67 sq ft | Lower wall bands |
| 5.5 in T&G plank | Plank board | 3.42 sq ft | Nooks and custom returns |
| Finished height | Look | Common rooms | Trim note |
|---|---|---|---|
| 32 in | Low cottage band | Powder rooms | Pairs well with cap only |
| 36 in | Classic chair rail | Entries, baths | Good around standard vanities |
| 42 in | Balanced mid-wall | Mudrooms, halls | Nice with shoe and cap |
| 48 in | Taller utility band | Laundry, stairs | Often needs corner trim |
| Spacing | Fasteners / sq ft | Adhesive pace | Best fit |
|---|---|---|---|
| 8 in o.c. | 6.6 | Full back bead | Thin panels and ceilings |
| 12 in o.c. | 5.1 | Continuous serpentine | Most interior walls |
| 16 in o.c. | 4.2 | Stud line bead | Stable sheet installs |
| Plank layout | 5.7 | Board back stripe | Narrow board features |
| Preset | Mode | Coverage | Default product |
|---|---|---|---|
| Powder room band | Wainscot | 108 sq ft gross | 32 x 48 panels |
| Nursery accent wall | Full wall | 96 sq ft gross | 4 x 8 MDF |
| Reading nook ceiling | Ceiling | 80 sq ft gross | 5.5 in T&G |
| Sunroom ceiling field | Ceiling | 168 sq ft gross | 4 x 8 PVC |
In order to install beadboards on the walls, you must first calculate the total area of the walls. Calculating the area ensure that you buy the correct amount of beadboard for your walls. To calculate the area of each wall, you must measure the height and the width of each wall.
You can calculate the area of each wall by multiplying the height of the wall by the width of the wall to find the square footage of the wall. Once you have the square footage of each wall, you must subtract the square footage of any areas of the walls that do not require beadboard to be installed, such as doors, windows, and vanities. You must subtract these area from the total square footage of the walls in order to ensure that you dont purchase excess beadboard for your walls.
How to Measure and Install Beadboard
Finally, you must add a certain percentage to the total area of the walls to account for any wasted beadboard during the installation process. A standard waste factor for most rooms is ten percent. Fifteen percent is recommend for rooms with odd angles or stairs.
Adding this percentage account for any mistakes that may occur in installing the beadboard. The type of beadboard that you use will depend upon the location of the beadboard installation. MDF beadboard is a popular choice for interior walls because MDF is easy to paint and relatively inexpensive.
However, PVC beadboard is a betterer alternative for areas that may be exposed to moisture, such as bathrooms and laundry rooms. Furthermore, if you are installing the beadboard on a ceiling, you may want to use planks instead of sheets of beadboard. Planks are better for small installation areas, but require more individual piece of beadboard.
Sheets of beadboard, such as four by eight panels of MDF, cover thirty-two square feet of area each. Sheets are more efficient for covering the area of wide walls. The orientation of the beadboard will impact the appearance of the installed beadboard.
Vertical orientations of the beadboard means that the boards will extend from the floor to the ceiling. Installing beadboard in vertical orientation makes the room appear taller. Horizontal orientation mean that the beadboard is installed in a way that it goes from one side of the wall to the other.
Horizontal orientation is generally used for ceilings and chair rail wainscoting. If you install the beadboard vertically, you should minimize the number of horizontal seams that the beadboard features. If you install the beadboard horizontally, you should make sure that the boards are installed in a way that they are parallel to the floor.
Trim is necessary to complete the installation of the beadboard. The piece of trim that goes on top of the beadboard is referred to as a top cap. The top cap covers the raw edge of the beadboard.
The piece of trim that goes on the bottom of the beadboard is referred to as shoe molding. This trim covers the gap that exist between the floor and the beadboard. Mitered edges or corner trim are also necessary to cover the corners of the installation site.
The trim that you use should be thick enough to cover the thickness of the beadboard. To secure the beadboard to the wall, you will need to use fasteners and adhesives. You should use nails or screws to secure the beadboard to the studs of the wall.
Place these nails or screws approximately sixteen inches apart. For installations on the ceiling, place the fasteners eight inches apart due to the pull of gravity on the beadboard. Adhesive should also be placed on the back of the beadboard panels.
Apply the adhesive to the beadboard in beads to ensure that the beadboard stick to the wall. Finally, you must paint the beadboard. Applying primer to the beadboard fills the grooves of the beadboard and allows the paint to adhere to the beadboard properly.
You should apply two coats of paint to the beadboard. Applying two coats of paint ensure that the color of the beadboard is even throughout the piece. The grooves of the beadboard will absorb more of the paint than a flat piece of wood will.
This means you will need to apply more paint then you may expect. By following these installation steps, you will ensure that the installation of your beadboard is accurate and that the beadboard is secured to the wall correctly.