Sealant Coverage Calculator
Estimate sealant volume and cartridge count from real joint geometry, depth ratio, movement class, substrate condition, and field handling losses for interior and exterior sealing jobs.
Each preset loads a practical sealing pattern so you can start from a realistic bath, trim, glazing, or movement-joint use case.
Inputs are always on their own row. Results appear in a separate full-width row directly below after calculation.
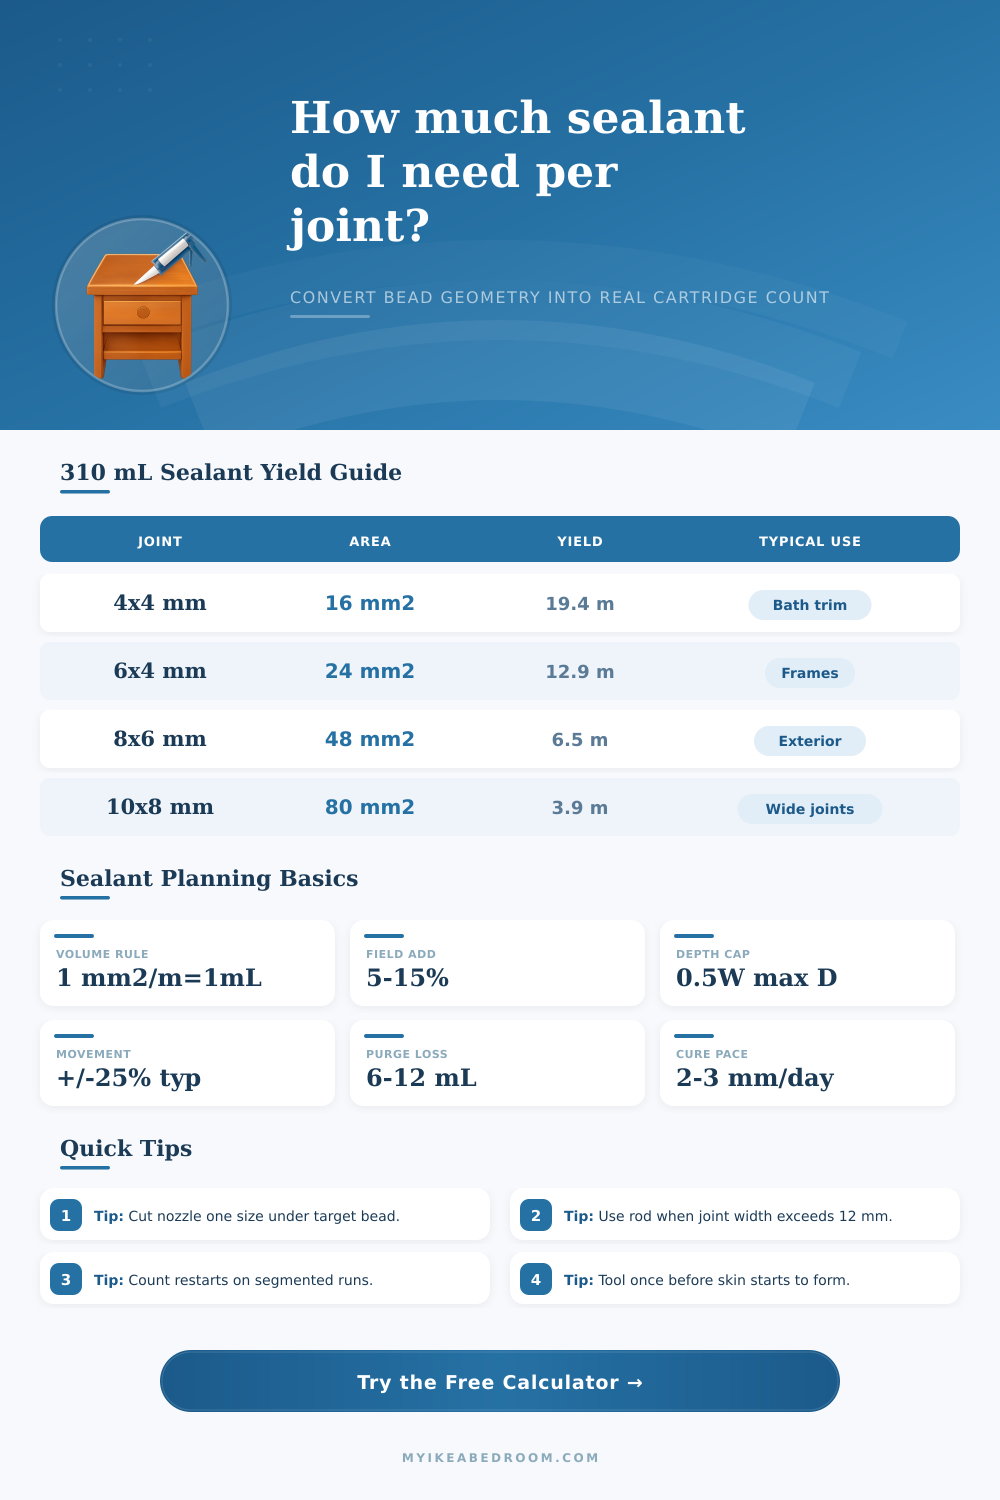
These tables help benchmark the calculator output against common sealant geometry, cartridge sizing, and movement assumptions.
| Joint size | Cross-section area | Approx 310 mL yield | Common use case |
|---|---|---|---|
| 4 x 4 mm | 16 mm2 | 19.4 m | Tub trims, mirror borders, and splash edge finishing. |
| 6 x 4 mm | 24 mm2 | 12.9 m | Window perimeter seams and light exterior frame joints. |
| 8 x 6 mm | 48 mm2 | 6.5 m | Weather joints with moderate movement demand. |
| 10 x 8 mm | 80 mm2 | 3.9 m | Wide expansion gaps that require controlled depth. |
| Joint width | Target depth | Ratio checkpoint | Coverage planning note |
|---|---|---|---|
| 3 to 6 mm | Near 1:1 | Width = depth | Narrow interior joints are often filled close to equal width and depth. |
| 6 to 12 mm | About 6 mm | Depth capped | Common trim and wet-area zone where concave tooling is preferred. |
| 12 to 20 mm | 6 to 10 mm | Near 2:1 | Backer rod usually improves movement life and cartridge yield. |
| 20 to 30 mm | 10 to 12 mm | Near 2:1 | Avoid deep solid fills that restrict elastic movement. |
| Package format | Nominal fill | Usable fill (after purge) | Typical planning use |
|---|---|---|---|
| Mini tube | 200 mL | 188 to 194 mL | Punch-list repairs and single-room callbacks. |
| Standard tube | 300 to 310 mL | 292 to 304 mL | Most bathroom, trim, and frame sealing tasks. |
| Medium sausage | 400 mL | 388 to 394 mL | Longer linear runs with fewer stop-start changes. |
| Large sausage | 600 mL | 586 to 594 mL | Facade and deck perimeter movement joints. |
| Movement class | Field multiplier | Typical substrates | Effect on coverage screen |
|---|---|---|---|
| Class 12.5 | 1.00x | Stable interior trim | Baseline handling demand and lowest reserve loading. |
| Class 25 | 1.05x | General wet area and window joints | Adds small allowance for elastic bead shaping and control. |
| Class 35 | 1.10x | Exterior perimeter movement zones | Raises adjusted volume for wider motion envelopes. |
| Class 50 | 1.16x | Facade and structural expansion joints | Requires the highest planning allowance in this model. |
Neutral silicone
Fast bathroom and glazing choice with broad non-porous compatibility.
Polyurethane
Strong adhesion on masonry and metals but usually needs more tooling effort.
Hybrid MS polymer
Balanced movement and paintability for mixed material interfaces.
Acrylic latex
Lower movement class option for interior paint-ready gaps.
Depth errors multiply volume faster than run-length errors. Set backer rod depth first, then measure total length, especially on joints wider than 12 mm.
Many short beads consume extra purge and overlap volume. Plan sequence so each cartridge runs longer continuous sections before swapping nozzles.
Calculating an amount of sealant needed for a project require that you consider a few different variable. Many people tend to underestimate the amount of sealant needed for a project due to only considering the length of the joint. However, the width and the depth of the joint also play a critical role in determining the total amount of sealant that is needed.
If you dont consider these factor, you may find that you do not have enough sealant for the job. This will cause delay in your project as you will have to stop to purchase more sealant. The width of the joint will play a critical role in the amount of sealant needed.
How Much Sealant Do You Need?
The more the width of the joint increase, the more volume of the sealant is needed. Consider the depth of the joint when calculating the amount of sealant needed. For movement joints, the depth of the joint should be approximately half the width of the joint.
If you set the depth too shallow, the sealant may crack due to not being able to stretch proper at the joint. However, if the depth of the joint is too deep, then you will use more sealant than you need for the job. For deeper joints, use a backer rod to limit the depth of the sealant.
Using a backer rod will ensure that the depth of the joint remain at half the width of the joint. Additionally, using a backer rod will prevent the sealant from adhering to three side of the joint. If the sealant adheres to three sides, it may not be able to move at the joint.
This could cause the sealant to fail. Depending on the type of sealant you use will play a critical role in the amount of sealant you use. For example, neutral silicone sealant will glide easy on smooth surfaces like tile or glass.
Polyurethane sealant is better for rough surface like concrete. However, polyurethane sealant is thicker and requires more effort to tool the sealant into the desired shape. This will use up more sealant from the cartridge.
The type of sealant you use also determine the movement class of the sealant. For instance, the sealant used on a window may only require a class 25 sealant. However, the sealant used for a balcony may require a class 50 sealant since the joint will have to move more at the balcony.
You must also account for sealant waste when calculating how much sealant will be needed. Always include a waste allowance of approximately 10 percent of the total amount of sealant needed for the job. Sealant waste occur when you purge the nozzle when you start a new section of work.
Additionally, some of the sealant get lost in the corners of the joint when you reposition the nozzle. If you work on long backsplashes, for instance, you will lose some of the sealant every time you reposition the nozzle. Climate also play a role in how much sealant you use.
In hot and dry climates the sealant will form a skin quick. Therefore, you will have to tool the sealant quick when you use it. In cold climate the sealant will be thicker.
Therefore, you will have to squeeze more sealant from the gun to properly tool it. Before you start using the sealant, you must cut the nozzle to the correct size. If you cut the nozzle too wide, you will dispense too much sealant.
This will increase the number of cartridge you will need to buy. If you cut the nozzle too narrow, you will have to apply more pressure to the sealant gun. This can cause you to become fatigue during your project.
You must tool the sealant immediately after you lay the bead of sealant. If you do not tool the sealant right away, the surface of the sealant will become tacky which will cause air bubble to get trapped in the sealant. Finally, you will round up the total number of cartridges of sealant you will need to ensure that you have enough sealant to complete your project.
To calculate the total volume of sealant needed, multiply the length of the joint by the width of the joint and the depth of the joint. Once you have the raw volume of sealant needed, add the 10 percent waste allowance. By following this example, you can calculate the total amount of sealant you will need to complete your project without having to stop to purchase more sealant.