Trim planning for baseboard edges
Shoe Molding Calculator
Estimate bedroom shoe molding footage, stock sticks, corner cuts, scarf joints, and gap coverage so the trim line finishes cleanly against flooring and baseboards.
These cards compare conservative gap coverage and reveal size before you pick a profile in the form.
Material choice changes moisture tolerance, paint prep, and how forgiving the trim is around long walls and uneven floors.
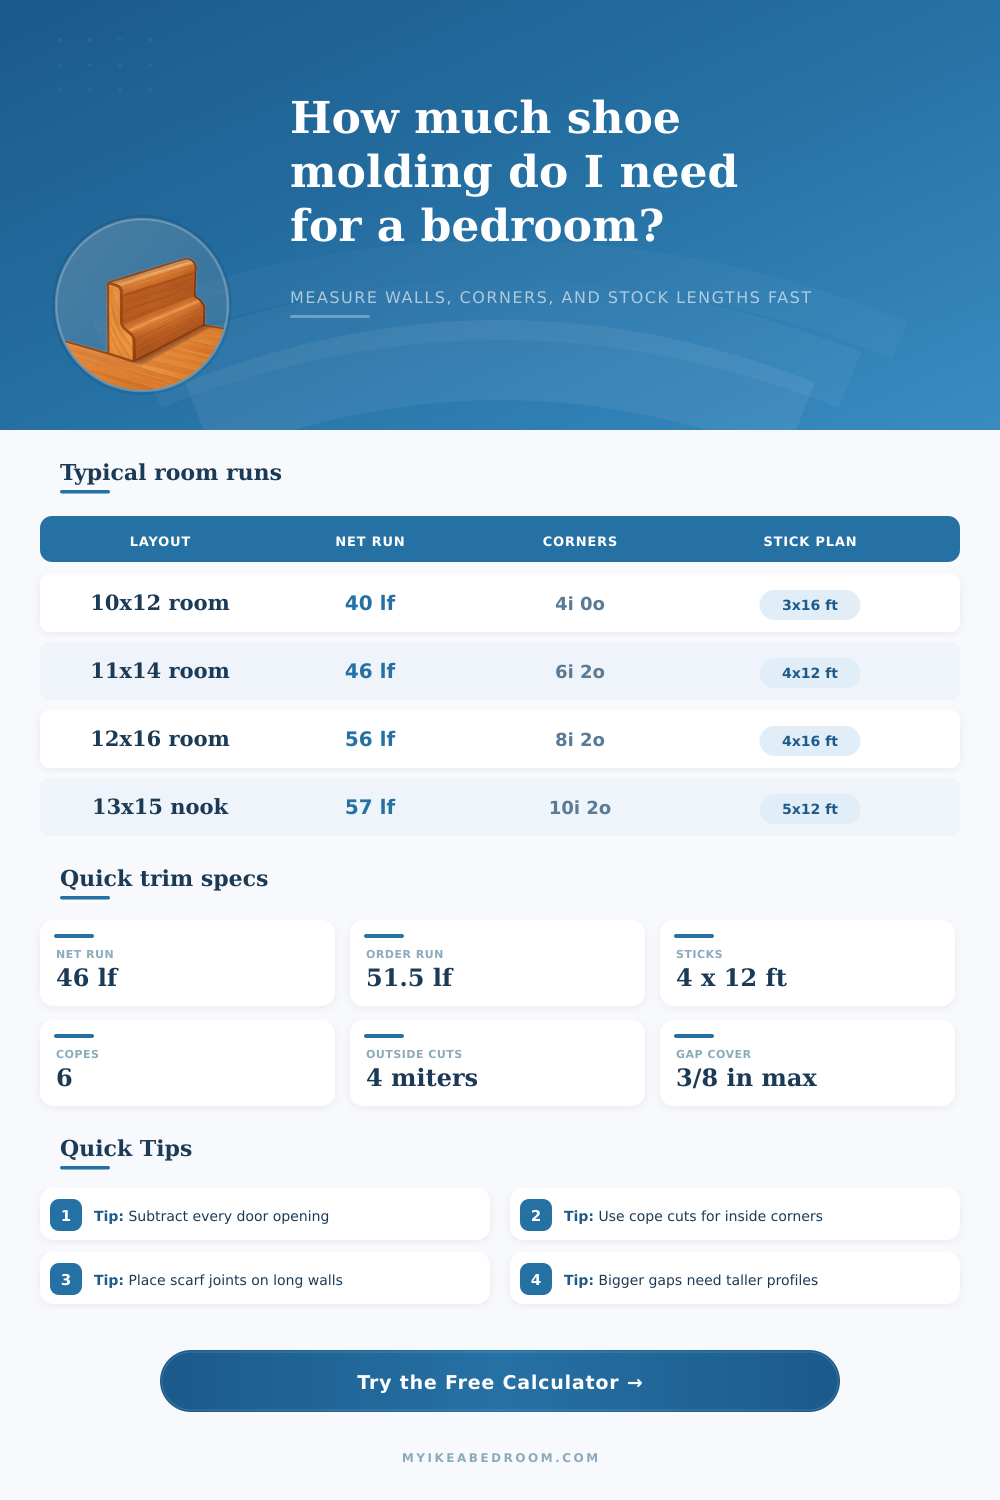
Shoe molding is used where the baseboard meets the floor. Shoe molding covers the gap between the baseboard and the flooring. The gaps between the two occur because the floor isnt level with the baseboard.
Shoe molding both hides the gaps and add decorative value to the wood flooring. To install shoe molding, one must measure the perimeter of the room. To do this, one can find the gross perimeter by measuring each of the wall in the room.
How to Measure and Install Shoe Molding
Once one obtains the gross perimeter, one must subtract the width of each door in the room. This is because shoe molding dont cover the doors. Additionally, any extra section of wall in the room, such as closets must be accounted for in the measurement of the perimeter.
Finally, one must account for an allowance for waste. If the room is simple with few corners and you are an experienced individual with experience installing shoe molding, you will use a ten percent waste allowance. However, if the room has many corner or if you are a beginner in installing shoe molding, a person uses a fifteen percent waste allowance.
The type of shoe molding that you should purchase will depend upon the width of the gap between the baseboard and the flooring. For gaps that are very narrow, such as in moddern homes and wooden floors, a slim shoe molding of three-eighths of an inch in thickness is used. For gaps that are more even with the baseboard, a half inch thickness of shoe molding will fill the gap well.
For gaps between the wooden floorboards and the baseboard that are very wide, you should purchase quarter round shoe molding as it will fill these gap with ease. The width of the gap will also determine the width of the shadow line that is formed where the shoe molding meet the wooden floor. The stock length of the shoe molding should be chosen in accordance with the length of the walls in the room.
Shoe molding come in eight-foot, twelve-foot, and sixteen-foot lengths. For walls that are longer than a single piece of shoe molding, a carpenter makes a scarf joint. A scarf joint is created when you cut two pieces of shoe molding at an angle, typically between thirty and forty-five degrees to the vertical wall.
These types of joints are best use on long, straight walls so they can be hidden from view. To install the shoe molding, you should nail the shoe molding into the baseboard every twelve to sixteen inches. If the baseboard is made of medium-density fiberboard (MDF), the shoes should be nailed closer together since MDF can warp.
Where the baseboard meets another baseboard, a cope cut should be made on one piece of shoe molding so that the shoe molding and baseboard fits into the corner. Where a corner of the room is to be covered, you should miter the shoe molding so that two pieces of shoe molding meets at an angle to create a seamless corner. The material for the shoe molding has a certain set of properties that must be considered before purchase.
For example, primed wood shoe molding is easy to paint but exposure to moisture can damage it. Another example is oak shoe molding, which is durable and you can stain to match the hardwood flooring but will show the grain of the wood. Lastly, PVC shoe molding is moisture resistant and good for bathrooms but doesnt provide the same visual aspect to a room as wooden shoe molding.
By following a specific order when installing shoe molding, one can avoid making mistakes in the installation of the shoe molding. For instance, one should dry-fit shoe molding into the corners of the room prior to nailing it into the baseboard. Dry-fitting of the shoe molding will allow an individual to view whether or not the corners will fit together proper.
Additionally, one should install shoe molding starting at the wall opposite of the entrance to the room. The shoe molding should also be coped at the inside corners first and metered at the outside corners last. By following these specific steps for installing shoe molding, the gaps between the wooden floorboards and the baseboard will be covered and the shoe molding will have a finished look to the room.