🚪 Shiplap Calculator
Estimate wall area, board counts, rows, seams, fasteners, and layout waste for bedroom accents, media walls, and custom room features.
📌Room presets
📋Board profile grid
📊Reference tables
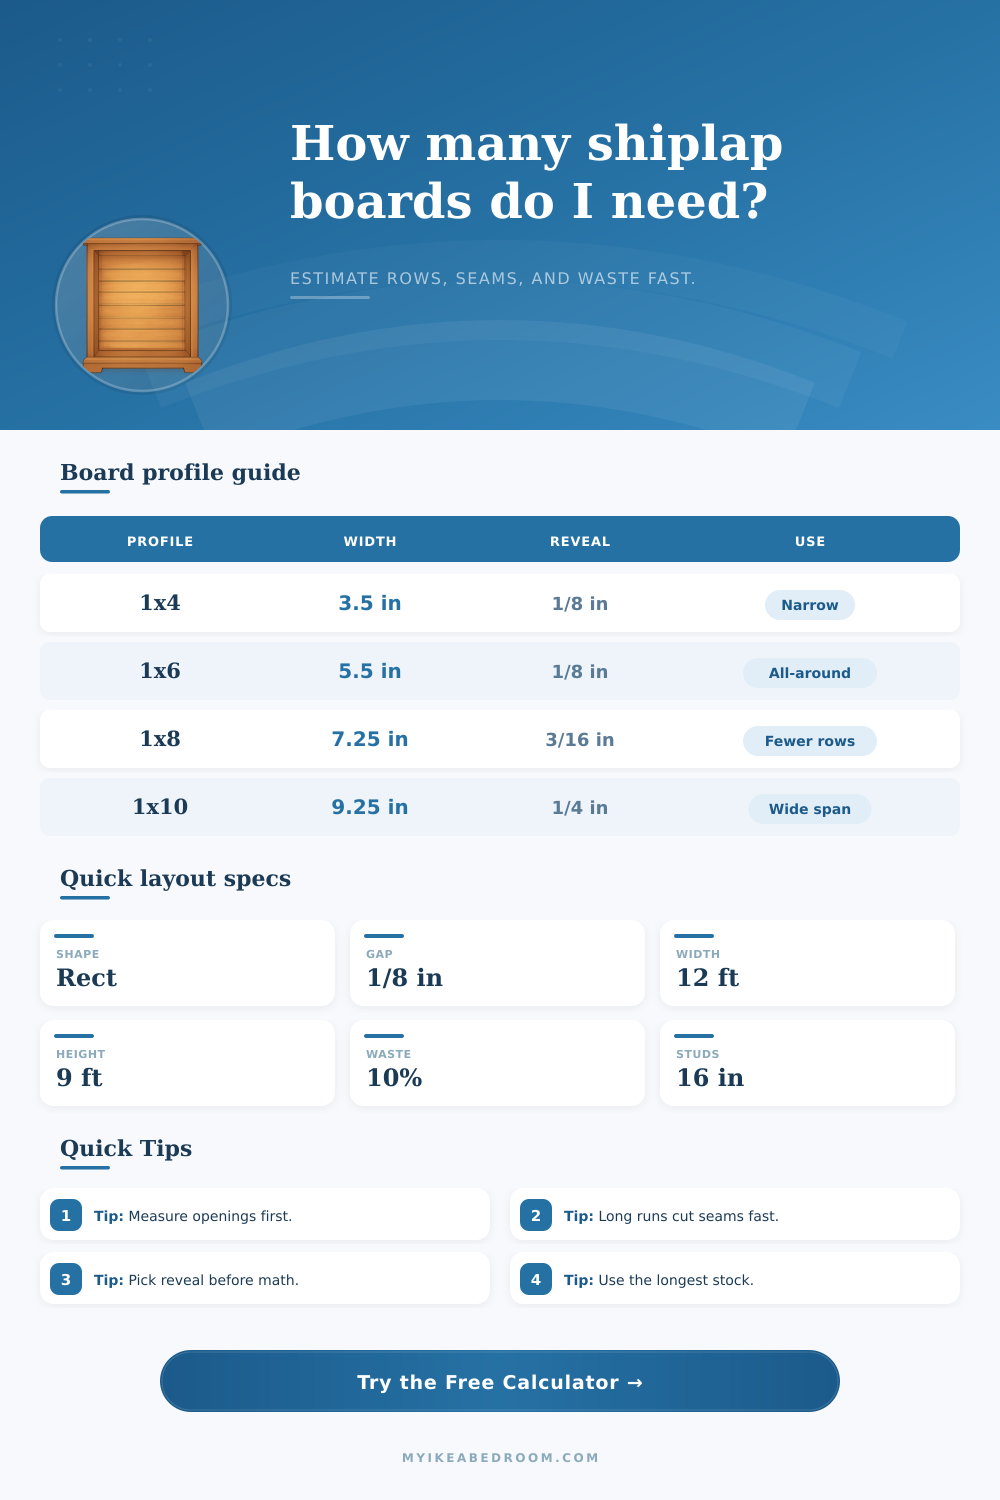
| Profile | Actual width | Reveal | Use |
|---|---|---|---|
| 1x4 | 3.5 in / 89 mm | 1/8 in / 3 mm | Narrow wall |
| 1x6 | 5.5 in / 140 mm | 1/8 in / 3 mm | All-around |
| 1x8 | 7.25 in / 184 mm | 3/16 in / 5 mm | Fewer rows |
| 1x10 | 9.25 in / 235 mm | 1/4 in / 6 mm | Wide span |
| Install | Run axis | Row cue | Seam cue |
|---|---|---|---|
| Horizontal | Width | Height drives | More cuts |
| Vertical | Height | Width drives | Tall look |
| Gable | Mixed | Peak adds rows | Trim peak |
| Custom | Manual | Area sets area | Exact fit |
| Stud spacing | Fasteners | Backup | Note |
|---|---|---|---|
| 12 in | 2 nails | Trim line | Tight grid |
| 16 in | 2 nails | Standard | Common wall |
| 24 in | 2 nails | Extra clip | Sparse bays |
| Custom | 2 nails | Check base | Verify studs |
| Scenario | Size | Area | Clad note |
|---|---|---|---|
| Bedroom wall | 12 x 9 ft | 108 sq ft | Accent wall |
| Nursery wall | 14 x 8 ft | 112 sq ft | Lower band |
| Media wall | 16 x 10 ft | 160 sq ft | Big span |
| Closet back | 6 x 8 ft | 48 sq ft | Fast build |
💡Practical tips
📈Calculation results
When you plan to install shiplap on a bedroom wall, you must calculate the amount of shiplap that is required for that partcular bedroom. You need to calculate the amount of shiplap that will be necessary to complete the installation of the shiplap on the bedroom wall. If there is too little shiplap, you will have to go back to the lumber yard to purchase the remaining shiplap board.
However, if there is too much shiplap, you will have wasted money on purchasing shiplap that you wont be utilizing for the installation project. Shiplap installation involve placing the wooden boards such that each board overlaps the one beneath it. The overlapping of these boards creates a shadow line along the top of each board.
How to Measure Shiplap for a Bedroom Wall
You can utilize this shadow line to provide some visual appeal to the shiplap wall installation, as well as to seal any drafts that may travel through the cracks between the boards. The dimension of the bedroom wall will determine the number of rows of shiplap that will be required for installation. For instance, if the wall is twelve feet in width and nine feet in height, you will have to measure the width of the shiplap boards to calculate the number of rows of shiplap that will be required to cover that area of the bedroom wall.
You should not use the nominal measurement of the width of the boards to calculate the number of rows; the actual width of the boards is a different measurement altogether. If you use the width of the shiplap boards incorrect, the shiplap will not reach the top of the bedroom wall. Furthermore, you must also make the decision of the direction of the shiplap installation.
Shiplap can be installed in either horizontal or vertical direction; horizontal shiplap makes the bedroom walls appear taller, while vertical shiplap makes the bedroom walls appear wider. Vertical shiplap require the use of longer shiplap boards. Vertical shiplap installation will create fewer seam in the shiplap installation compared to installing the shiplap in the horizontal direction.
Fewer seams in the shiplap installation is desirable because there are fewer piece to which you will nail the shiplap boards. The stud in the bedroom wall will be spaced sixteen inches apart, and the shiplap should be nailable into these studs. The shiplap will not be stable if it isnt secured to these wall stud.
The presence of windows and door in the bedroom will also impact the amount of shiplap that must be purchased. The area of the wall that is taken up by the window or door will reduce the total area of the bedroom wall that must be covered with shiplap. However, you will require a buffer of approximately ten percent in the calculations to allow for waste in the shiplap installation.
Additionally, the decision of the width of the shiplap will impact the number of row that will be required to cover the bedroom wall. If you use narrow shiplap boards, such as 1×4 boards, more rows will be required to cover the bedroom wall than if you use wide shiplap boards, such as 1×8 boards. 1×8 boards are also more difficult to level properly than 1×4 boards.
The size of the reveal between the shiplap boards will also impact the appearance of the shiplap installation; if the reveal is to be large, the shadow created by the shiplap boards will be wider than if the reveal is small. Common mistake that should of been avoided during the installation of shiplap include measuring the nominal width of the boards instead of the actual width. Another mistake is failing to acclimite the shiplap to the bedroom in which it will be installed.
The shiplap should be allowed to sit in the bedroom walls for at least one day prior to installation; the humidity in the bedroom may alter the dimensions of the shiplap. If you allow the shiplap to dry in the bedroom, the line created by the shiplap may not be straight. Finally, it is necessary to check the location of the studs prior to nailing the shiplap to the bedroom wall.
You should secure the shiplap to these studs to prevent it from not being stable when installed.