🧵 Envelope Pillow Cover Calculator
Calculate exact fabric cut sizes for front and back panels — no zipper required.
~0.75 yd fabric
~0.85 yd fabric
~1.0 yd fabric
~1.25 yd fabric
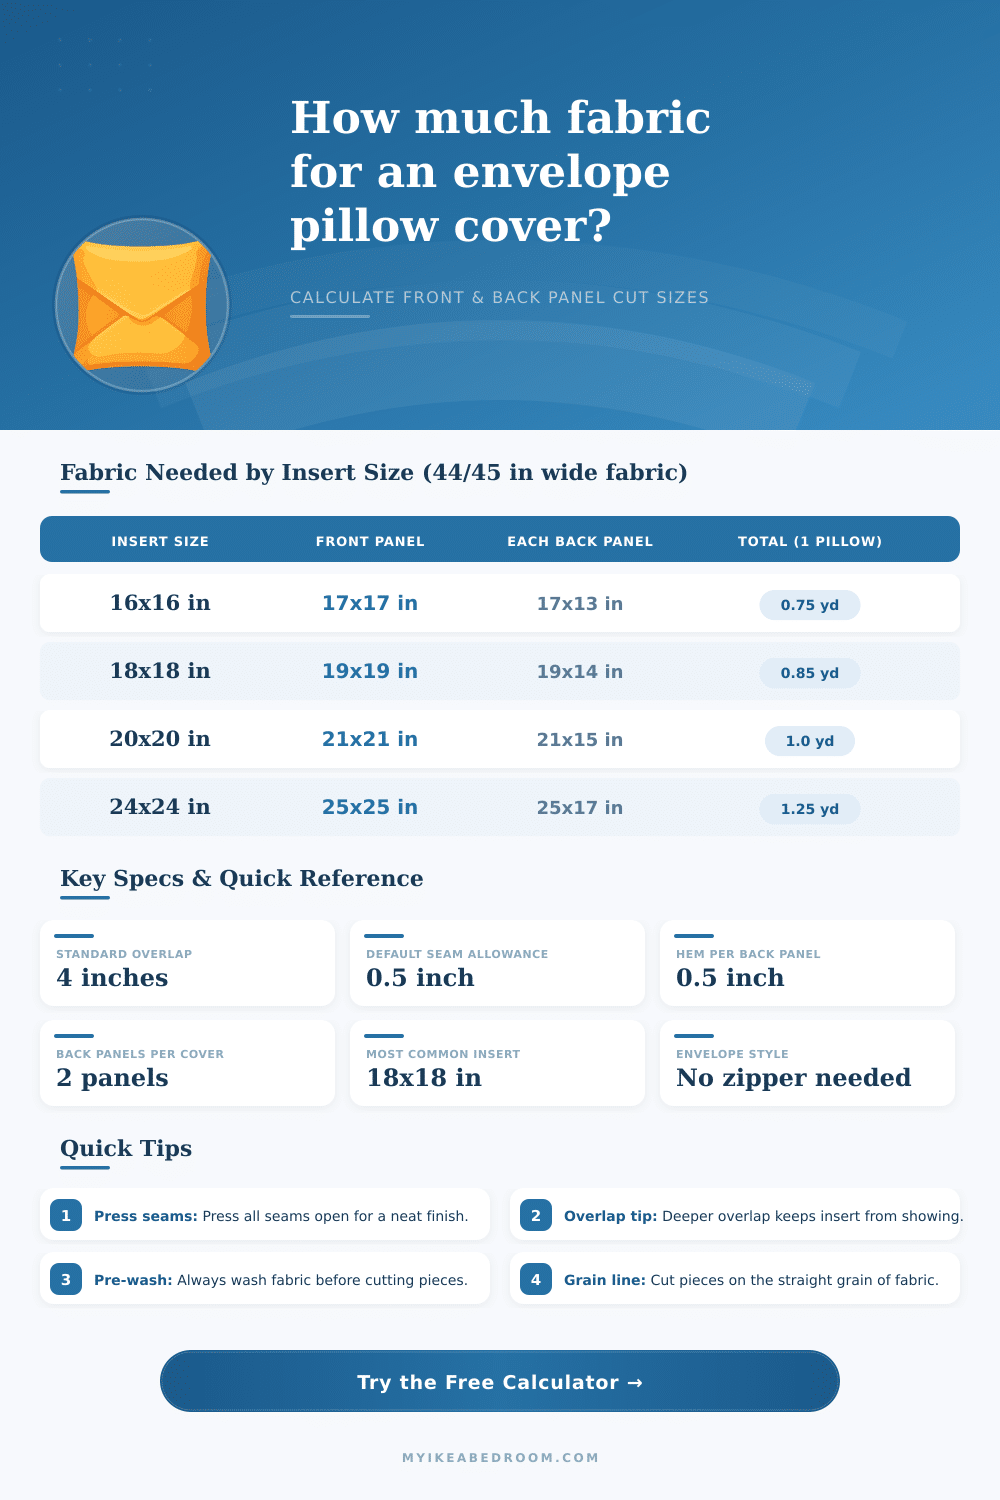
| Insert Size | Front Panel Cut | Each Back Panel Cut | Total Fabric (1 pillow) |
|---|---|---|---|
| 12×12 in | 13×13 in | 13×11.5 in | ~0.65 yd |
| 14×20 in (lumbar) | 15×21 in | 15×15.5 in | ~0.75 yd |
| 16×16 in | 17×17 in | 17×13 in | ~0.75 yd |
| 18×18 in | 19×19 in | 19×14 in | ~0.85 yd |
| 20×20 in | 21×21 in | 21×15 in | ~1.0 yd |
| 22×22 in | 23×23 in | 23×16 in | ~1.1 yd |
| 24×24 in | 25×25 in | 25×17 in | ~1.25 yd |
| 26×26 in (euro) | 27×27 in | 27×18 in | ~1.5 yd |
| Seam Allowance | Best For | Added to Each Edge | Total Added to Width/Height |
|---|---|---|---|
| 0.25 in (¼") | Lightweight cotton, quilt fabric | 0.25 in per edge | +0.5 in total |
| 0.5 in (½") | Standard — most home dec fabric | 0.5 in per edge | +1 in total |
| 0.75 in (¾") | Heavier fabric, beginners | 0.75 in per edge | +1.5 in total |
| 1 in | Canvas, upholstery fabric | 1 in per edge | +2 in total |
| Overlap Depth | Description | Best For | Each Back Panel Extra Height |
|---|---|---|---|
| 3 in | Small / minimal | Lightweight inserts, decorative pillows | +3 in per panel |
| 4 in | Standard (recommended) | Most 16"–22" square pillows | +4 in per panel |
| 5 in | Generous | Larger inserts, heavier fills | +5 in per panel |
| 6 in | Deep / secure | 24"+ inserts, euro pillows | +6 in per panel |
Envelope pillow covers became very popular in the last years and honestly, it is easy to understand why. Rather than your usual pillowcase that has seals at the ends, an envelope cover closes neatly at the back, so that it looks like an envelope, hence the name. The secret is two overlapping bits at the back that allow the pillow to slip in without any zippers, buttons or complex seals.
That overlap does all the work, keeping everything snug and safe.
How to Make an Envelope Pillow Cover
What attracts about the envelope design is its simplicity and practicality. The front and the back are made of the same fabric during the whole thing. The real advantage?
You can easily remove the cover whenevr you want, but the internal pillow stays concealed, something you do not find with a regular pillowcase.
Making your own envelope cover is honestly one of the easiest projects, and it is a wonderful way to refresh a sofa or bed with new color. Because they are so cheap to make, they are perfect for changing the look for the seasons or holidays without spending too much money. When you have little time but want to change your decor, these covers are exactly what you require.
There are two basic ways to do that. You can use one big piece of fabric and fold it in envelope form. Or you can choose the three-piece way, where you sew two back pieces that overlap to create the envelope opening for the pillow.
Either way you do, they are very easily removed, which means they are entirely washable and you can change the look of your room whenever you feel that.
For start, hem the back pieces folding them about half inch, then folding again before sewing. Later, serge all raw edges of your three pieces to clean them. Lay the front of the cover on the table with the right side up, then lay each back piece up, with the sides together and the edges lined.
They must cross one above the other in the center, as planned.
For the cutting, start with the front square, it must match the size of your insert. For a 20-inch pillow, cut a 20×20-inch square. Then cut two pieces of 20×15 inches for the back; these overlap to form the envelope.
Recall that the finished cover should be about half inch bigger on every side than the insert. So, if you use an 18-inch square, your cover should be a 19-inch square.
Here is the problem about zippers in beds, you widely avoid them because they commonly damage in the wash or can fade. Envelope closure keeps everything naturally in place, and hence so many folks favor it. Even so, occasionally the pillow can slip from the envelope, so search for a deeper overlap or position it more to the center to keep everything whereit belongs.