🧶 Granny Square Blanket Size Calculator
Calculate exactly how many granny squares you need for any blanket size
| Blanket Type | Dimensions (in) | Dimensions (cm) | 4" Squares | 6" Squares | 8" Squares |
|---|---|---|---|---|---|
| Stroller / Pram | 30 × 36 | 76 × 91 | 63 | 24 | 12 |
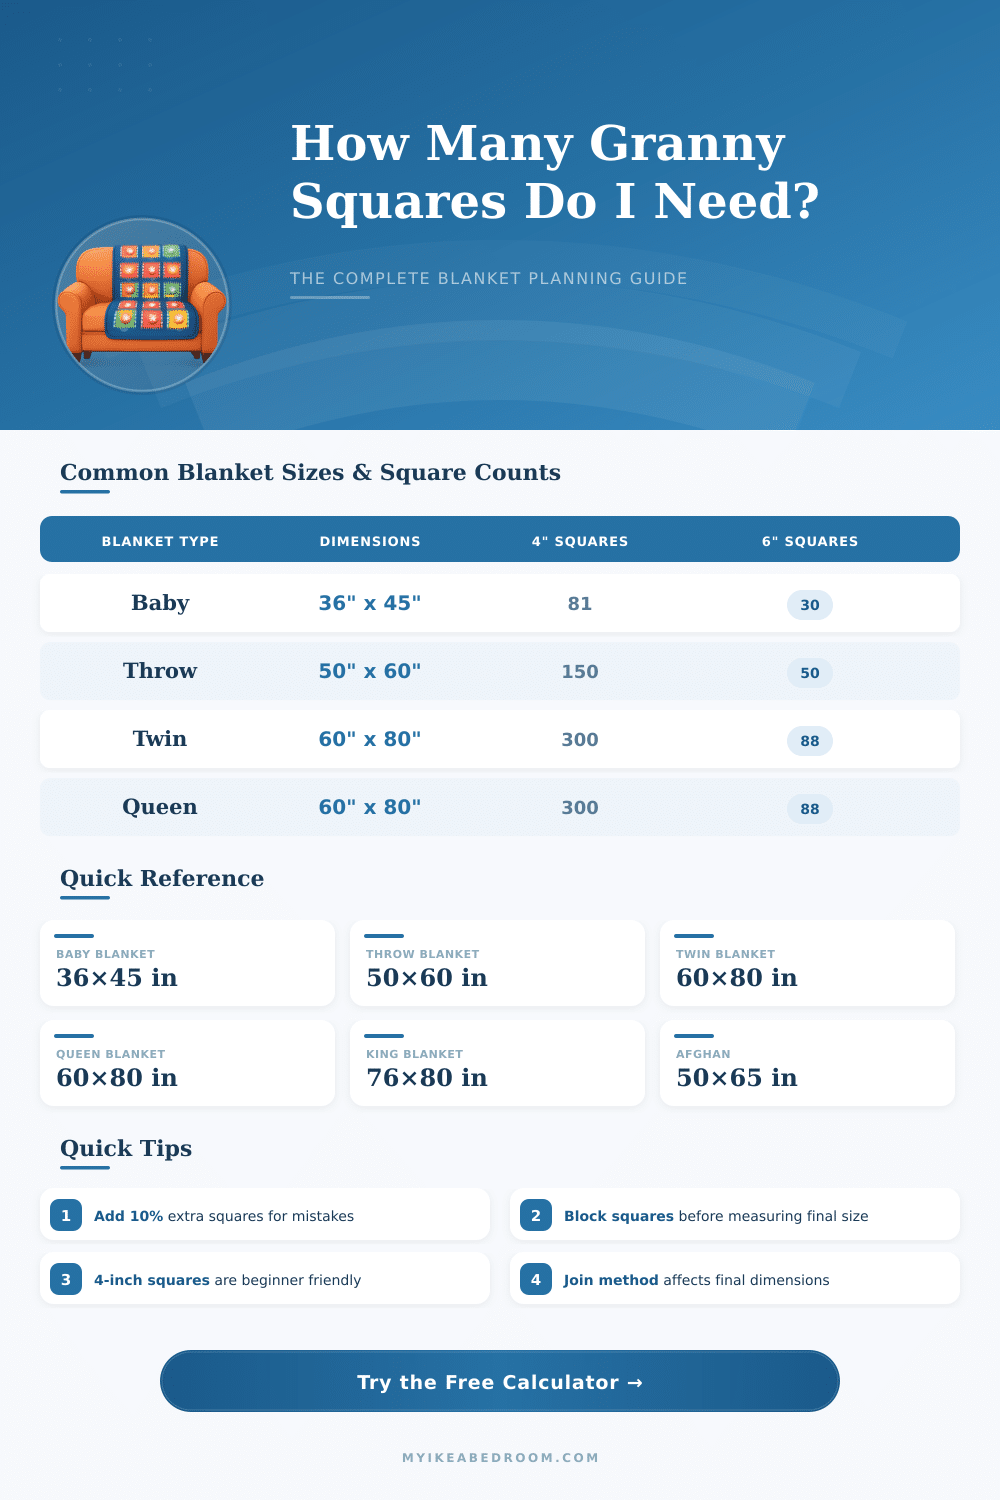
| Baby Blanket | 36 × 45 | 91 × 114 | 90 | 30 | 18 |
| Lapghan | 36 × 48 | 91 × 122 | 108 | 48 | 24 |
| Throw Blanket | 50 × 60 | 127 × 152 | 150 | 50 | 30 |
| Afghan | 50 × 65 | 127 × 165 | 169 | 60 | 35 |
| Twin Bed | 60 × 80 | 152 × 203 | 300 | 100 | 60 |
| Full / Double | 60 × 80 | 152 × 203 | 300 | 100 | 60 |
| Queen Bed | 60 × 80 | 152 × 203 | 300 | 100 | 60 |
| King Bed | 76 × 80 | 193 × 203 | 380 | 126 | 76 |
| Wall Hanging | 24 × 24 | 61 × 61 | 36 | 16 | 9 |
| Yarn Weight | Hook Size | Yardage / 100g | Sq / Skein (4") | Sq / Skein (6") | Sq / Skein (8") |
|---|---|---|---|---|---|
| Fingering (1) | 3.5mm | 400–450 yds | 7–8 | 3–4 | 2 |
| DK (3) | 4.0mm | 220–280 yds | 6–8 | 3 | 1–2 |
| Worsted (4) | 5.0mm | 180–220 yds | 8–10 | 3–4 | 2 |
| Bulky (5) | 6.0mm | 100–150 yds | 6–9 | 2–3 | 1–2 |
| Super Bulky (6) | 8.0mm | 60–100 yds | 5–8 | 2 | 1 |
| Jumbo (7) | 10.0mm+ | 30–60 yds | 3–6 | 1–2 | 1 |
| Square Size | Sq Size (cm) | Rows for 50" | Cols for 60" | Total Squares | Best For |
|---|---|---|---|---|---|
| 3 inches | 7.6 cm | 17 | 20 | 340 | Delicate, baby items |
| 4 inches | 10.2 cm | 13 | 15 | 195 | Beginners, throws |
| 5 inches | 12.7 cm | 10 | 12 | 120 | Quick projects |
| 6 inches | 15.2 cm | 9 | 10 | 90 | Afghans, bed blankets |
| 8 inches | 20.3 cm | 7 | 8 | 56 | Large, fast projects |
| 10 inches | 25.4 cm | 5 | 6 | 30 | Statement pieces |
| 12 inches | 30.5 cm | 5 | 5 | 25 | Jumbo yarn projects |
The granny square is a classic pattern for crochet that works well for beginners and expert makers. It is based on chain and double crochet stitches, arranged in groups of three. Chain stitches normally separate every group.
In corner spaces, one does sets of double crochet stitches, joined by chains. To start a round, do two double crochet stitches to create the first granny group. At every side chain-space, chain one and then crochet three double in that space.
How to Make a Granny Square Blanket
For corner chain-three spaces chain one, then do three double, chain three, again three double and end with chain one.
An interesting idea is to create the blanket from one single big granny square. This way it turns out very soft, thick and comfortable. Simply add rounds until you reach the wanted size.
The rainbow granny square blanket follwos the same process… One can fit it to any size based on the number of rounds.
Otherwise, one can make many little squares and join them. The amount needed depends on the size of the squares and on the intended size of the blanket. For example, one project required 140 pieces for a single bed cover.
Another used squares of 5-inch size, combined in community-style. When quite a lot of squares are ready, they get joined together. One way is too bind with simple crochet stitches.
The second is the continuous joining while one goes.
Many types of granny squares exist. Some have a heart center, while others show flowers. The farmhouse granny squares form a diamond pattern when one combines them.
Also textured squares arrange in checkerboard design, with plain granny squares between them.
A good tip is to turn the work after every round. It stops the crochet from twisting and getting a spiral look. Unless one wants that look, which some prefer.
Beginners can enjoy themselves with classic flat granny squares in different colors, which gives a nice patchwork effect.
#How much time does a granny square blanket take? It varies based on your speed, the size of the blanket and whether one works at random times or daily. Also the type of yarn and the hook size matters, because bigger materials allow faster progress.
One person finished a blanket in only four days for a baby gift. Another started and left it with twenty squares sitting there years before.
For washing, most granny square blankets are made from acrylic yarn and wash well in a gentle machine cycle. Put them in a dryer only enough time to remove the main moisture, while they stay a bit damp for more pleasant use. Adding aborder at the end evens out rough edges and gives the blanket a finished look.