🧱 Tile Layout Calculator
Calculate exactly how many tiles you need for any room — with waste overage, box counts, and grout joint options.
per sq ft
per sq ft
per sq ft
per sq ft
per sq ft
per sq ft
per sq ft
per sq ft
| Layout Pattern | Recommended Waste | Reason | Best For |
|---|---|---|---|
| Straight / Grid | 8–10% | Minimal cuts | Kitchens, bathrooms |
| Brick / Offset | 10% | Some edge cuts | Subway tiles, floors |
| Herringbone | 12–15% | Many angle cuts | Entryways, feature walls |
| Diagonal (45°) | 15–20% | Heavy corner cuts | Small rooms (appear larger) |
| Tile Size (in) | Tile Size (cm) | Sq Ft per Tile | Tiles per 100 sq ft |
|---|---|---|---|
| 4 x 4 | 10 x 10 cm | 0.11 sq ft | 900 tiles |
| 6 x 6 | 15 x 15 cm | 0.25 sq ft | 400 tiles |
| 3 x 12 (subway) | 7.6 x 30.5 cm | 0.25 sq ft | 400 tiles |
| 12 x 12 | 30 x 30 cm | 1.00 sq ft | 100 tiles |
| 12 x 24 | 30 x 60 cm | 2.00 sq ft | 50 tiles |
| 18 x 18 | 45 x 45 cm | 2.25 sq ft | 44 tiles |
| 24 x 24 | 60 x 60 cm | 4.00 sq ft | 25 tiles |
| 36 x 36 | 90 x 90 cm | 9.00 sq ft | 12 tiles |
| Project | Area (sq ft) | Tiles Needed | Boxes (16 sq ft/box) |
|---|---|---|---|
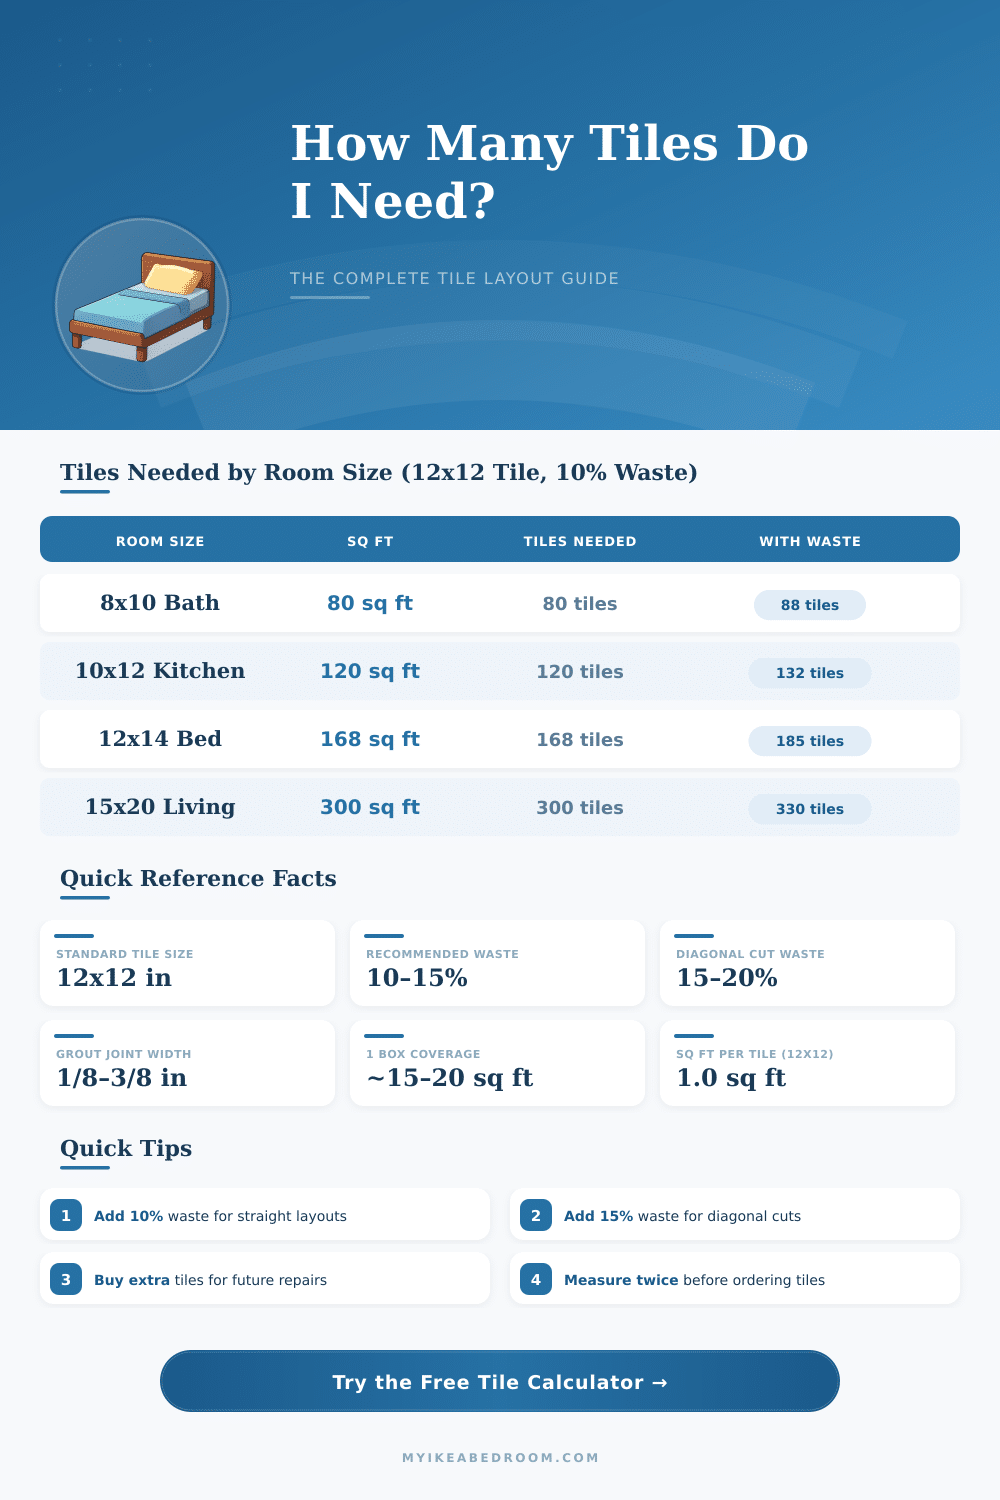
| Small Bathroom 5x7 | 35 sq ft | 39 | 3 boxes |
| Bathroom 8x10 | 80 sq ft | 88 | 6 boxes |
| Kitchen 10x12 | 120 sq ft | 132 | 9 boxes |
| Bedroom 12x14 | 168 sq ft | 185 | 12 boxes |
| Living Room 15x20 | 300 sq ft | 330 | 21 boxes |
| Patio 12x16 | 192 sq ft | 211 | 14 boxes |
Tile Layout can totally change the look and feel of the room. Layout on the floor changes the look of the space and even its size. Layout behind the counter adds fresh layers of charm to the whole style, especially if one chooses unique monochromatic floors.
Start from the centre of the room is great advice. That gives much more good balance than start from a wall. Find the centre of the space and mark it, later find the centres of every wall and mark them also, that is the idea.
How to Plan a Tile Layout
From here one can arrange the floors in a 45-degree angle, if one wants, although it commonly requires more cutting and so more floors.
The Layout should be balanced and centered, with all pieces more than half a floor, if it is possible. Cut floors look better, when one places them carefully. Almost never the area for floor exactly matches with a full number of floors, so some will need cutting.
Center the Layout along the most visible wall is a wise step, later turn to teh corners with limits like this, that the gaps and lines go through them.
Direct Layout is more liked for big flat floors, because it does a clean, modern look with few lines. Diagonal Layout adds visual charm and can make little rooms seem bigger, but everything depends on personal taste. Diagonal style can be difficult, especially at walls.
The classic Tile style, also called brick Layout, running bond or offset, is when floors shift like this, that each gap hits the centre of the floor up and below. That Layout gives a feeling of laid-back, lived vibe that seems easy. The used floors are longer and plain.
Some favour 50 percent offset with white floor and white gap for a clean look. Others choose a third offset, that, according to some, better stops cracks at large floors.
Little squares mixed with bigger rectangles create an elegant basket Layout. That classic style looks well in traditional ore modern designs.
During setup of floors in random shape with three sizes, the amounts for every size do not reach 100 percent. That means various looks during the process. There are tools that allow folks to pick one, two or several sizes of floors before choosing the wanted Layout and learn how many floors are needed.
Before Tile, it is good to lay the floors on the floor outside, to picture the style. When one lays new floor, the Layout should be carefully planned. Use board to mark where the joints will fall…
Horizontally and vertically. This helps to keepeverything in line. Chalk lines help to keep the plan precise, instead of trusting only on your eyes.