📏 Vinyl Plank Flooring Layout Calculator
Calculate exact planks, rows, boxes, and total square footage needed for your vinyl plank flooring project
| Plank Width | Rows (10 ft room) | Rows (12 ft room) | Rows (14 ft room) | Rows (16 ft room) |
|---|---|---|---|---|
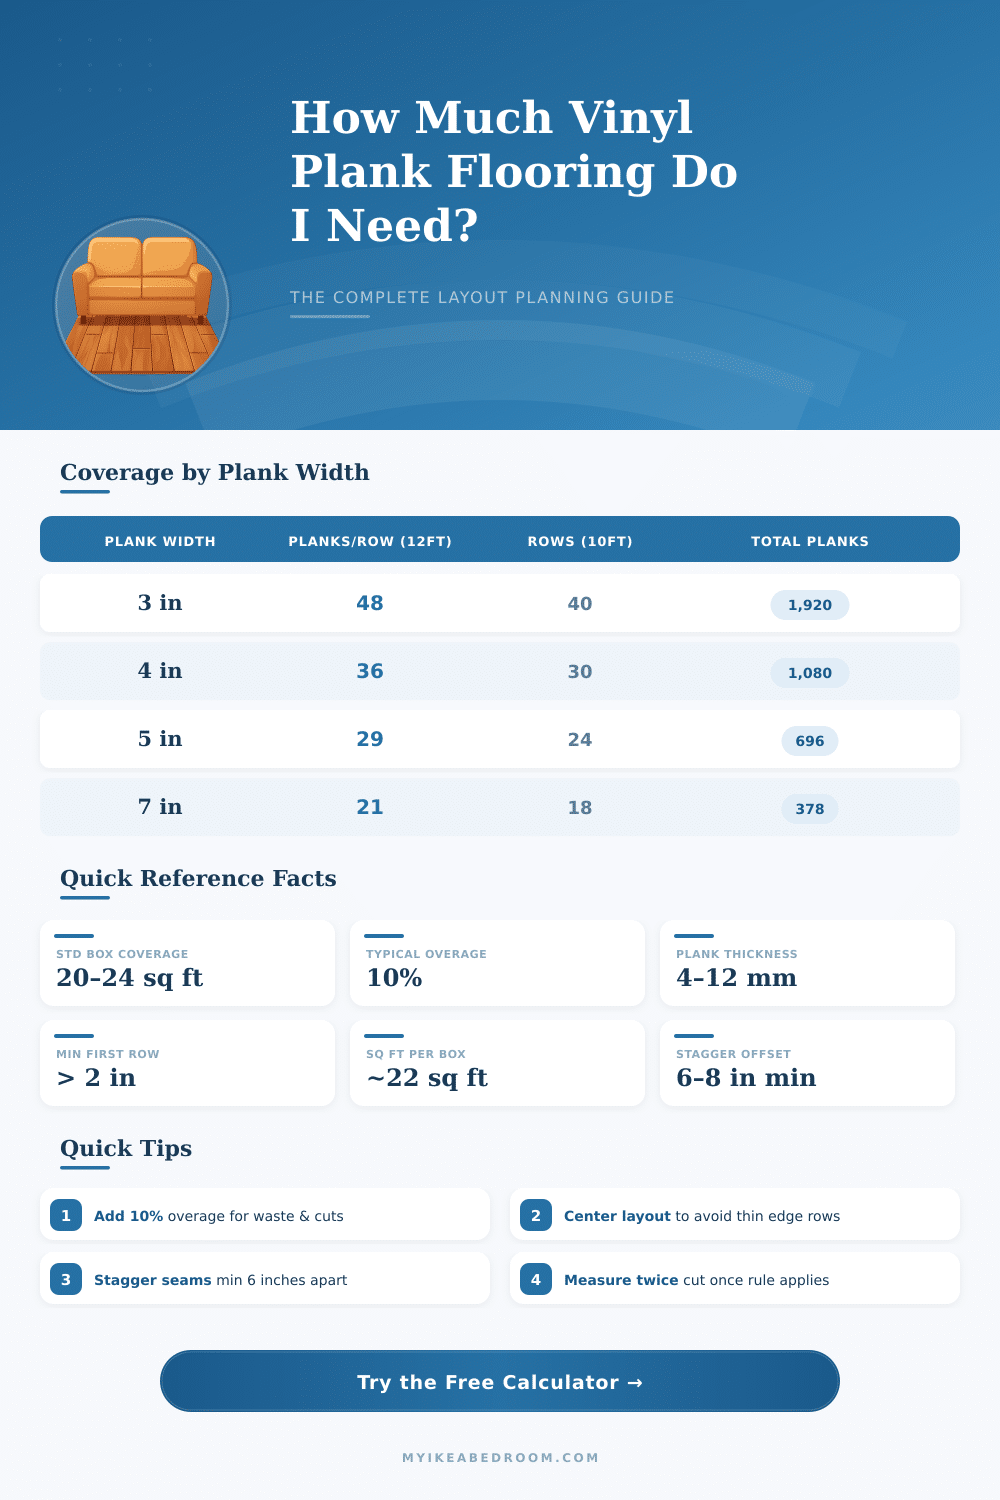
| 3 in (7.6 cm) | 40 rows | 48 rows | 56 rows | 64 rows |
| 4 in (10.2 cm) | 30 rows | 36 rows | 42 rows | 48 rows |
| 5 in (12.7 cm) | 24 rows | 29 rows | 34 rows | 38 rows |
| 6 in (15.2 cm) | 20 rows | 24 rows | 28 rows | 32 rows |
| 7 in (17.8 cm) | 18 rows | 21 rows | 24 rows | 28 rows |
| 8 in (20.3 cm) | 15 rows | 18 rows | 21 rows | 24 rows |
| Room Area (sq ft) | Boxes @ 20 sq ft | Boxes @ 22 sq ft | Boxes @ 24 sq ft | Boxes @ 30 sq ft |
|---|---|---|---|---|
| 100 sq ft (9.3 m²) | 5 | 5 | 5 | 4 |
| 150 sq ft (13.9 m²) | 8 | 7 | 7 | 6 |
| 200 sq ft (18.6 m²) | 10 | 10 | 9 | 7 |
| 300 sq ft (27.9 m²) | 15 | 14 | 13 | 11 |
| 400 sq ft (37.2 m²) | 20 | 19 | 17 | 14 |
| 500 sq ft (46.5 m²) | 25 | 23 | 21 | 17 |
| Room | Typical Size | Area (sq ft) | Boxes Needed (22 sq ft, +10%) | Rows (5 in plank) |
|---|---|---|---|---|
| Small Bedroom | 10 x 10 ft | 100 sq ft | 6 boxes | 24 rows |
| Standard Bedroom | 12 x 14 ft | 168 sq ft | 9 boxes | 34 rows |
| Master Bedroom | 14 x 16 ft | 224 sq ft | 12 boxes | 38 rows |
| Living Room | 15 x 20 ft | 300 sq ft | 15 boxes | 48 rows |
| Open Plan | 20 x 25 ft | 500 sq ft | 25 boxes | 60 rows |
| Kitchen | 10 x 12 ft | 120 sq ft | 7 boxes | 29 rows |
| Hallway | 4 x 20 ft | 80 sq ft | 5 boxes | 10 rows |
| Bathroom | 8 x 10 ft | 80 sq ft | 5 boxes | 24 rows |
| Layout Pattern | Waste Factor | Recommended Overage | Best For |
|---|---|---|---|
| Straight / Parallel | 5–8% | 10% | Most rooms |
| Staggered (standard) | 7–10% | 10% | Long rooms |
| Diagonal (45°) | 10–15% | 15–20% | Visual interest |
| Herringbone | 12–18% | 15–20% | Luxury look |
| Irregular room | 10–20% | 15–20% | Alcoves, L-shapes |
Take time to plan the Layout of your Vinyl Plank Flooring before you start the actual install. Apps for plans can help a lot, it lets you see the pattern of your room try different setups and picture how colours and materials truly will look in your space before you buy something.
Here is something that folks commonly forget: measure the length of your space and divide it by the width of floors. Believe me, no one wants to end up with only one-inch crack that seems too thin and must be covered by a step piece. During measurement, consider only the upper surface of the floor itself, not the whole piece with tongue and grooves.
Plan the Layout of Your Vinyl Plank Floor
A laser level truly surprises here. It lets you shoot a lnie that runs along your main walls, and truly, you can plan a whole floor level in around twenty minutes.
The staggered pattern that most people use works well for nice results. Start by placing the first strip directly across the room. For the second, start with a half floor, then add full.
The third strip starts with a whole floor, cut to the right length, but leave at least six-inch gap from the nearest joint. H-shaped joints are your enemies, avoid them. Here is where it gets smooth: the fourth strip uses the rest of the second, and the fifth takes what stays of the third.
Then cut fresh floor for the sixth, and the pattern simply repeats until the finish.
Every next strip must be offset from the prior won. That removes those repeat stairs and gives the whole thing a smoother, more clean look.
The direction that you choose matters more than one thinks. Starting along the longest straight wall helps to keep everything lined up. In narrow spaces; like hallways or narrow kitchens; lay floors long to make the room seem more open.
Turn them across, and narrow rooms quickly will seem more wide. If your corners are not perfectly square, diagonal Layout can be the most striking. Usually, the floor installs to match the main natural light from where it comes.
For houses without inside walls that share the area, run the floors from the inside door until the far finish to create a vast, clean feel. For T-shaped rooms? Start from the long side of the main part.
Find one central place, usually the hallway (where the floor must be perfectly fixed), and work from there.
Besides straight lines, you can play with diagonals or herringbone patterns. A herringbone pattern adds movement to the space. Mixing the widths of floors gives depth and interest, especially in dining rooms, hallways, and living rooms.
Because Vinyl Plank Flooring floats above the subfloor instead of being firmly fixed, there is naturally a small gap where the edges touch the walls. Your baseboards and quarter-round trim will coverthose spaces anyway, so it does not matter.